
Headless Pi Zero W Wifi Setup (Windows)

This article covers setting up the Pi Zero W for headless SSH access over WiFi using Windows 10. The Mac OS version of these instructions can be found here: Setup Pi Zero W Headless Wifi (Mac).
Step 1. Download a Lite Raspbian Image
These instructions are for a Raspbian Stretch image that I downloaded from here:
https://www.raspberrypi.org/downloads/raspbian/
I'm using the lite image (no desktop) version 4.9 from March 13, 2018.
Once you download the file, there is no need to unzip it. Just leave it in your Downloads folder and I'll show you how to burn it to an SD card.
Step 2. Burn the Raspbian image to the SD card
To burn an image to the SD card you can use balenaEtcher (formerly known as just Etcher).
- Browse to: https://www.balena.io/etcher/
- Download for Windows x64
- Run Setup (Open the download folder and click I Agree)
- The installer may launch balenaEtcher when done - if you close it you can always find and run it later
To run balenaEtcher is pretty straight forward.
Put a blank mini SD card and adapter into your Windows machine. No need to format it. You can use a new SD card right out of the package.
- Select image - browse to the *.zip file you downloaded from Raspbian
- Select drive - it may find the SDHC Card automatically
- Click Flash!
After you flash (burn) the image, File Explorer may have trouble seeing it. A simple fix is to pull the SD card out then plug it back in. It should appear with the name "boot" followed by a drive letter.
Step 3. Enable ssh
For security reasons, ssh is no longer enabled by default. To enable it you need to place a blank text file called "ssh" in the root of the boot SD by doing the following:
- Run Notepad
- In a new file put in one space and nothing more
- Click File / Save As ...
- Be sure to set Save as type to All Files (so the file is NOT saved with a .txt extension)
- Call the file ssh and save it
- Close the file
Step 4. Add Network Info
To add network info you need to create a second text file called wpa_supplicant.conf and place that in the root of the boot SD too.
- Run Notepad
- Paste in the contents below (adjusting for the name of your country code, network name and network password):
country=US ctrl_interface=DIR=/var/run/wpa_supplicant GROUP=netdev update_config=1 network={ ssid="NETWORK-NAME" psk="NETWORK-PASSWORD" } - Click File / Save As ...
- Be sure to set Save as type to All Files (so the file is NOT saved with a .txt extension)
- Call the file wpa_supplicant.conf and save it
- Close the file
Step 5. Eject the Disk
In File Explorer right-click on the boot SD and select Eject from the context menu.
The command won't physically eject the disk/card. It's more of a logical eject: meaning it's safe to remove the card now.
Step 6. Install Bonjour
You can find Raspberry Pi's on your network using their hostname followed by .local (example: raspberrypi.local). But to do that in Windows you have to install the Bonjour service first.
If you have iTunes installed on Windows you probably don't have to do this. But if you don't, browse to:
Download Bonjour Print Services for Windows v2.0.2 and run the installer.
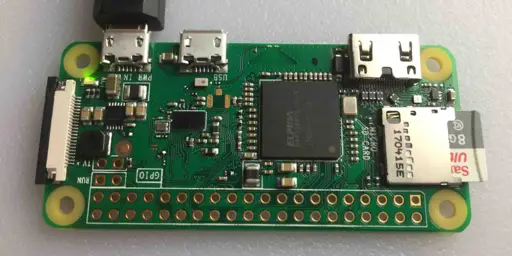
Step 7. Boot the Pi Zero W
- Put the SD card into the Pi Zero W
- Plug a Micro-USB power cable into the power port (the one closest to the end of the board)
- Give the Pi Zero plenty of time to bootup (it can take as much as 90 seconds -- or more)
Step 8. Install Putty
If you already have Putty installed, skipped to the next step.
- Browse to: https://www.putty.org
- Download the 64-bit MSI (Windows Installer)
- Open it to run the installer (if asked for permission, click Yes)
- Select: Add shortcut to PuTTY on the Desktop
Step 9. Login over WiFi using Putty
This part assumes that ssh is enabled for your image and that the default user is pi with a password of raspberry.
NOTE: Your Windows machine must be on the same WiFi network that you configured the Pi for.
- Launch Putty
- Set the Host Name (or IP address) field to raspberrypi.local
- By default the Port should be set to 22 and Connection type should be set to SSH
- Click Open
- If you see a Security Alert select Yes
- A new terminal window should appear prompting you for a user name
- The default user name is: pi
- The default password is: raspberry
Congratulations! You can now access your Pi Zero W over wifi!
If you can't connect, see the troubleshooting section near the end of this article. You may need to make some adjustments for your network.
Step 10. Change your Hostname and Password
Because your Pi is now on the network, you should immediately change the hostname and password.
At the Raspberry Pi command line type:
sudo raspi-config
Select the options for changing the hostname and password. On a new image, I would also recommend expanding the file system (now under the Advanced options). Once the changes are made, reboot. This will cause your Raspberry Pi to lose the connection. After it has had time to reboot, connect again using Putty.
Step 11. Get the Updates
Once connected over WiFi, the next thing you should do is run some updates:
sudo apt-get update -y
sudo apt-get upgrade -y
Troubleshooting
If you have trouble connecting over wifi, see my instructions for accessing a Pi Zero over a USB cable: Headless Pi Zero SSH Access over USB (Windows). Once connected you should be able to fix any issues.
Here are some helpful commands for debugging network and wifi issues on your Pi:
- This command should list your network in the first line for wlan0:
iwconfig - This command should show info for wlan0:
ifconfig - This command should list your network name:
iwlist wlan0 scan | grep ESSID - To edit or review your wifi settings, run this command:
sudo nano /etc/wpa_supplicant/wpa_supplicant.conf
Related articles
Here are some related articles that I wrote:
- Headless Pi Zero SSH Access over USB (Windows)
- Raspberry Pi Touchscreen Kiosk Setup
- Setup Pi Zero Wifi
- Raspberry Pi Resource Guide
References
- Setting up WiFi via the Command Line [1]