
How to blink a D1 Mini Pro onboard LED (Mac)
In this article I show you how to blink the onboard LED of a WeMos D1 Mini Pro board. These instructions were written using a Mac, but can easily be adapted for Windows.
To blink the onboard LED of a D1 Mini Pro board you can program it like an Arduino board. Once you add support for the board to the Arduino IDE, you can write and run a simple blink example.
In the steps below, I will show you how to do that.
Where to buy
Several manufacturers create their own version of the WeMos D1 Mini Pro board. If you would like to use the one that I used for this article, you can buy it from Amazon in the US using my affiliate link (note that this is a 2 Pack):
The model I use has a micro-USB connection. So I used a cable from one of my Android devices. You could try this cable:
Step 1. Plug the D1 Mini Pro into your Mac
The first thing that you need to do is plug the D1 Mini Pro board into your Mac. The board will be powered by the USB cable for this example. So you won't need an external power supply.
- Plug the USB cable into your laptop
- Plug the USB cable into your D1 Mini Pro board
Step 2. Download the Arduino IDE
This article was tested using the Arduino IDE version 1.8.10.
- Browse to: https://www.arduino.cc/en/Main/Software
- Download the IDE for your operating system
Mac Instructions
- Double click the *.zip file to extract the application
- Copy the Arduino app to the Applications folder
Step 3: Configure the Arduino IDE for D1 Mini Pro boards
- Start the Arduino IDE
- From the main menu select Arduino > Preferences...
- For Additional Board Manager URLs enter in the field on its own line:
https://arduino.esp8266.com/stable/package_esp8266com_index.json
- Select Tools > Board: * > Boards Manager...
- Type in esp8266
- You should see a listing for esp8266 by ESP8266 Community
- Click Install
- Click Close
Step 4. Select your board
- Select Tools > Board: *
- Select your board (I selected LOLIN(WEMOS) Mini Pro)
Step 5: Run the example Blink sketch
- Select File > Examples > 01. Basics > Blink
The code should look something like this:
// the setup function runs once when you press reset or power the board
void setup() {
  // initialize digital pin LED_BUILTIN as an output.
  pinMode(LED_BUILTIN, OUTPUT);
}

// the loop function runs over and over again forever
void loop() {
  digitalWrite(LED_BUILTIN, HIGH);   // Arduino: turn the LED on (HIGH)
                                     // D1 Mini Pro: turns the LED *off*
  delay(1000);                       // wait for a second
  digitalWrite(LED_BUILTIN, LOW);    // Arduino: turn the LED off (LOW)
                                     // D1 Mini Pro: turns the LED *on*
  delay(1000);                       // wait for a second
}
Code description
On the D1 Mini Pro the LED_BUILTIN is backwards
For a standard Arduino, pulling the LED_BUILTIN to HIGH would turn the LED on. But on D1 Mini Pro that actually turns the LED off. You will note that I added some comments to the default example above. So be aware that the comments in the default Blink code are backwards.
- The setup function sets up the onboard LED as an output pin, so it can be turned on and off
- The loop repeatedly turns the LED on and off by toggling the voltage level between HIGH and LOW
- Delays are used to control how quickly the LED turns on and off
Step 6: Upload the code to the D1 Mini Pro
- Click the Upload button (the right pointing arrow in the IDE tool bar)
Step 7: Verify it works
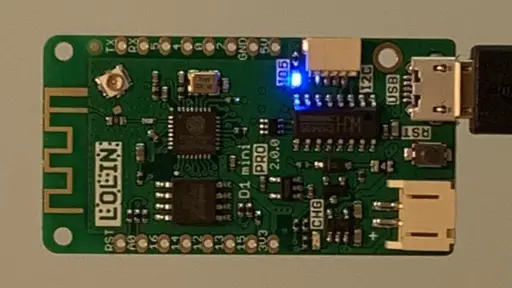
- Verify that you see the onboard LED blinking on and off
On my board the LED is blue.
Next step
You can experiment with this simple example by changing the delay values and uploading new code to the device. Make the delay different enough so that you can confirm that your changes are working.
Conclusion
The D1 Mini Pro board is part of a family of open hardware devices. Not all devices look or act the same but they are based on the same chipset. So if you are using a different device you may get different results.
Treating the D1 Mini Pro board as an Arduino is only one option. But a good place to start as a beginner.
Related articles
See my related articles, where I show how to blink the LED for other types of Arduino boards:
- How to Build an Arduino Uno Robot (Free Course)
- How to blink a D1 Mini onboard LED (Mac)
- How to blink an ESP32 onboard LED (Mac)
- Seeeduino Nano Grove Setup (Arduino Compatible)