
Headless Pi Zero SSH Access over USB (Windows)
This article covers setting up a Pi Zero or Pi Zero W for headless SSH access over USB using Windows 10. The Mac OS version of these instructions can be found here: SSH into Pi Zero over USB (Mac).
When you first get a Pi Zero the big question is -- how do you access it? You can get a powered USB hub, USB keyboard, USB mouse and HDMI adapter. Or you can just plug it into your computer directly and access it over USB using ssh.
These instructions are for a Raspbian Stretch image that I downloaded from here:
https://www.raspberrypi.org/downloads/raspbian/
I'm using the lite image (no desktop) version 4.9 from March 13, 2018. I've also done this with an older desktop version.
Step 1. Edit the Image
To access the Pi Zero over USB you have to edit the image first.
- If you need to burn a new image to an SD card, download the Etcher tool from https://etcher.io
- If you have the SD card in your Pi Zero, power it down and remove it
- Put the SD card into an adapter and plug it into your computer
- NOTE: Windows gets confused when you plug in a Raspbian image and it may try to get you to format it - always hit Cancel
- In Windows 10 the SD card should appear in File Explorer as a drive named "boot"
- If you just burned a new image using Etcher you may need to pull the SD card out and plug it back in again for File Explorer to see it
- Open the SD card and explore the contents in File Explorer
- You should now see the contents of the root of your Raspbian boot image
Step 2. Enable ssh
There was a security update to the Raspbian images. Now to enable ssh by default you have to place an empty filed named ssh (no extension) in the root of the card.
- Run Notepad
- In a new file put in one space and nothing more
- Click File / Save As ...
- Be sure to set Save as type to All Files (so the file is NOT saved with a .txt extension)
- Call the file ssh and save it
- Close the file
Step 3. Download Notepad++
Windows Notepad can't handle the carriage returns in the Linux based files that we need to edit next. To do that you need to download a free tool called Notepad++.
- Download Notepad++ from https://notepad-plus-plus.org
- Install the 64-bit version.
Step 4. Edit config.txt
- In the root folder of the SD card, open config.txt in Notepad++ (right click on the file and there should be an edit option)
- Append this line to the bottom of that file:
dtoverlay=dwc2
- Save the file
Step 5. Edit cmdline.txt
- In the root folder of the SD card, open cmdline.txt in Notepad++
- After rootwait, append this text leaving only one space between rootwait and the new text (otherwise it might not be parsed correctly):
modules-load=dwc2,g_ether
- If there was any text after the new text make sure that there is only one space between that text and the new text
- Save the file
On a fresh image that has never been booted, you may see extra text after rootwait. But if you boot the pi from the disk at least once, that extra text may go away. That is why you must put the new text directly after rootwait - so it doesn't get accidentally deleted.
Step 6. Install Bonjour
You can find Raspberry Pi's on your network using their hostname followed by .local (example: raspberrypi.local). But to do that in Windows you have to install the Bonjour service first.
If you have iTunes installed on Windows you probably don't have to do this. But if you don't, browse to:
Download Bonjour Print Services for Windows v2.0.2 and run the installer.
Step 7. Boot the Pi Zero
- Put the SD card into the Pi Zero
- Plug a Micro-USB cable into the data/peripherals port (the one closest to the center of the board -- see picture above)
- You do NOT need to plug in external power -- it will get it from your computer
- Plug the other end into a USB port on your computer
- Give the Pi Zero plenty of time to bootup (can take as much as 90 seconds -- or more)
Step 8. Install Putty
If you already have Putty installed, skipped to the next step.
- Browse to: https://www.putty.org
- Download the 64-bit MSI (Windows Installer)
- Open it to run the installer (if asked for permission, click Yes)
- Select: Add shortcut to PuTTY on the Desktop
Step 9. Login over USB using Putty
This part assumes that ssh is enabled for your image and that the default user is pi with a password of raspberry.
- Launch Putty
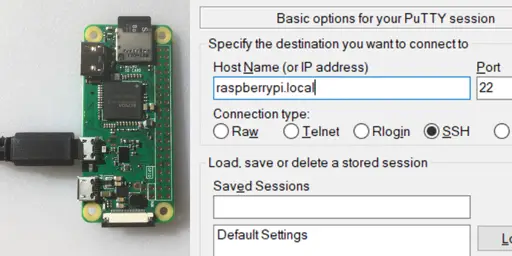
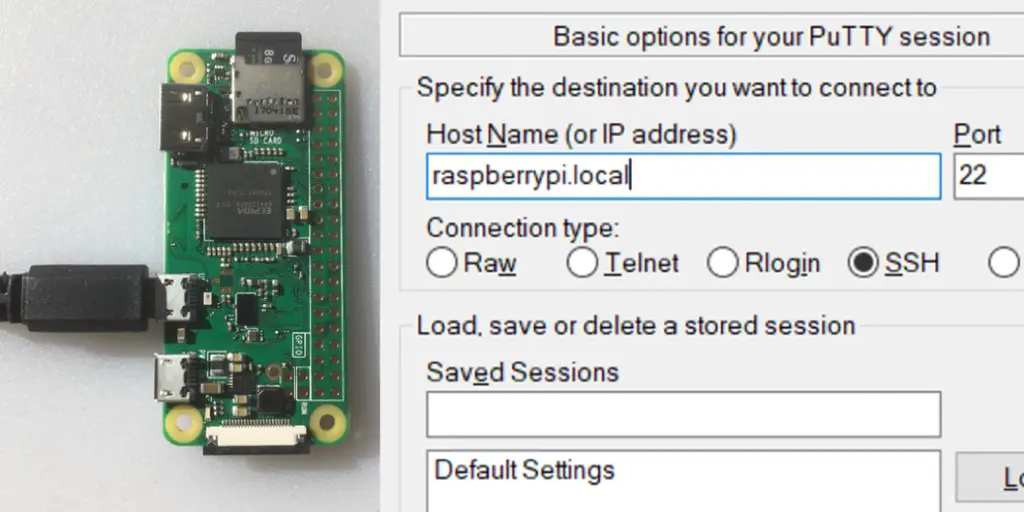
- If this is a new image, set the Host Name (or IP address) field to raspberrypi.local (if not use
your-pi-host-name.local) - By default the Port should be set to 22 and Connection type should be set to SSH
- Click Open
- If you see a Security Alert select Yes
- A new terminal window should appear prompting you for a user name
- For user name on a new image enter: pi
- For a new image the default password is: raspberry
Congratulations! You can now access your Pi Zero with just a USB cable.
Step 10. Access the network
By default a pi attached to a Windows 10 machine via USB cable can't access the network (unless the pi itself has been already setup for wireless or network access).
To allow the pi to access the network through the Windows machines, do the following:
- Under Control Panel launch Network and Sharing Center
- In my case my laptop is connected through Wi-Fi, so I selected the entry for my network
- Click Properties
- Click the Sharing tab
- Check Allow other network users to connect through this computer's Internet connection
- Click OK and then Close
- In the terminal Window opened through Putty, type
ping www.google.comand verify that you are connected to the Internet