
Headless Raspberry Pi 4 SSH WiFi Setup (Mac + Windows, 10 Steps)
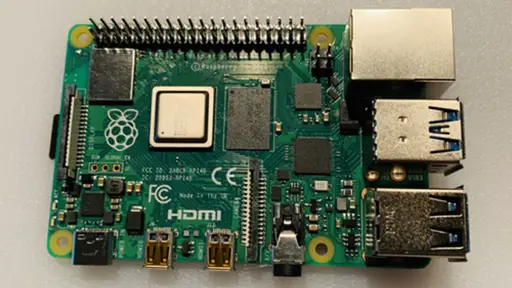
This article covers setting up a Raspberry Pi 4 Model B for headless SSH access over WiFi using a Mac or Windows 10. These instructions have also been tested on a Pi Zero W 1.3.
These instructions are for the 32-bit operating system. If you want to install the 64-bit operating system see: Headless Raspberry Pi 4 SSH WiFi Setup (64-Bit, Mac + Windows, 12 Steps)
Instructions for a Pi Zero W 2 can be found here: Headless Raspberry Pi Zero 2 W SSH WiFi Setup (Mac + Windows, 10 Steps).
Instructions for a Raspberry Pi 3 B+ can be found here: Headless Raspberry Pi 3 B+ SSH WiFi Setup (Mac + Windows).
Step 1. Download Raspberry Pi OS Bullseye lite
These instructions were tested on both Raspberry Pi OS Buster and Bullseye. You can download the latest image from here:
https://www.raspberrypi.org/software/operating-systems/
The most recent image used to test these instructions was the lite Bullseye image (no desktop) 32-bit, kernel version 5.10 from January 28, 2022.
If you need older versions, download the .zip file from here:
https://downloads.raspberrypi.org/raspios_lite_armhf/images/
Step 2. Burn the Raspberry Pi OS image to the SD card
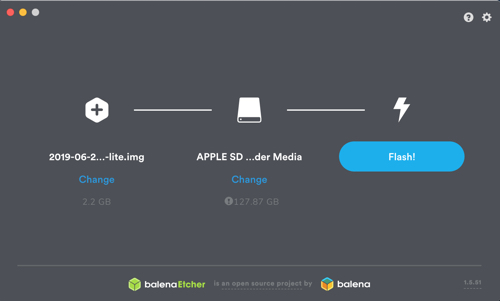
To burn an image to the SD card you can use Etcher.
- Browse to
https://www.balena.io/etcher/ - Download the version for your operating system
- Run the installer
To run Etcher is pretty straight forward.
Put a blank mini SD card and adapter into your machine. No need to format it. You can use a new SD card right out of the package.
- Click Flash from file - browse to the zip file you downloaded for Raspberry Pi OS
- Click Select target - it may find the SDHC Card automatically, if not select it
- Click Flash! - you may be prompted for your password
After you flash (burn) the image, Finder (Mac) or File Explorer (Windows) may have trouble seeing it. A simple fix is to pull the SD card out then plug it back in. On a Mac it should appear on the desktop with the name boot. On Windows it should appear in File Explorer with the name boot followed by a drive letter.
Step 3. Enable ssh to allow remote login
For security reasons, ssh is no longer enabled by default. To enable it you need to place an empty file named ssh (no extension) in the root of the boot disk.
Open up a terminal window and run this command:
touch /Volumes/boot/ssh
- Run Notepad
- In a new file put in one space and nothing more
- Click File / Save As ...
- Be sure to set Save as type to All Files (so the file is NOT saved with a .txt extension)
- Call the file ssh and save it
- Close the file
If you are comfortable with the Windows command line you could try this instead (untested!):
- Open up a command line
- Switch to the drive and root where boot is located:
- Type:
type NUL >> ssh - Verify that file ssh was created
Step 4. Add your WiFi network info
Create a file in the root of boot called: wpa_supplicant.conf (instructions below). Then paste the following into it (adjusting for your ISO 3166 alpha-2 country code, network name and network password):
country=US
ctrl_interface=DIR=/var/run/wpa_supplicant GROUP=netdev
update_config=1

network={
    ssid="NETWORK-NAME"
    psk="NETWORK-PASSWORD"
}
Create a new empty file that will hold network info:
touch /Volumes/boot/wpa_supplicant.conf
Edit the file that you just created and paste the text above into it (adjusting for the name of your country code, network name and network password):
- Run Notepad
- Paste in the contents above (adjusting for the name of your country code, network name and network password)
- Click File / Save As ...
- Be sure to set Save as type to All Files (so the file is NOT saved with a .txt extension)
- Call the file
wpa_supplicant.confand save it - Close the file
Step 5. Eject the micro SD card
- Right-click on boot (on your desktop or File Explorer) and select the Eject option
- This is a "logical" eject - meaning it closes files and preps the SD card for removal - you still have to pull the card out yourself
Step 6. Boot the Raspberry Pi from the micro SD card
- Remove the mini-SD card from the adapter and plug it into the Raspberry Pi
- Raspberry Pi 4: Plug a USB-C power supply cable into the power port
- Pi Zero W: Plug a micro-USB power supply cable into the power port
- Give the Pi plenty of time to boot up (it can take as much as 90 seconds -- or more)
Step 7. Login remotely over WiFi
This part assumes that ssh is enabled for your image and that the default user is pi with a password of raspberry.
NOTE: Your machine must be on the same WiFi network that you configured the Pi for.
- Open up a terminal window
- Run the following commands:
ssh-keygen -R raspberrypi.local
ssh pi@raspberrypi.local
- Don't worry if you get a host not found error for the first command - the idea is to clear out any previous references to raspberrypi.local
- If the pi won't respond, press Ctrl-C and try the last command again
- If prompted with a warning just hit enter to accept the default (Yes)
- Type in the password -- by default this is raspberry
Install Bonjour
You can find Raspberry Pi's on your network using their hostname followed by .local (example: raspberrypi.local). But to do that in Windows you have to install the Bonjour service first.
If you have iTunes installed on Windows you probably don't have to do this. But if you don't, browse to:
Download Bonjour Print Services for Windows v2.0.2
and run the installer.
Install Putty
If you already have Putty installed, skip to the next section.
- Browse to:
https://www.putty.org - Download the 64-bit MSI (Windows Installer)
- Open it to run the installer (if asked for permission, click Yes)
- Select: Add shortcut to PuTTY on the Desktop
Login over WiFi using Putty
This part assumes that ssh is enabled for your image and that the default user is pi with a password of raspberry.
- Launch Putty
- Set the Host Name (or IP address) field to raspberrypi.local
- By default the Port should be set to 22 and Connection type should be set to SSH
- Click Open
- If you see a Security Alert select Yes
- A new terminal window should appear prompting you for a user name
- The default user name is: pi
- The default password is: raspberry
Step 8. Change your hostname and password
Congratulations! You can now access your Raspberry Pi over wifi!
If you can't connect, see the troubleshooting section near the end of this article. You may need to make some adjustments for your network.
Because your pi is now on the network, you should immediately change the hostname and password.
At the Pi command line type:
sudo raspi-config
Select the options for changing the hostname and password. On a new image, I would also recommend expanding the file system (now under the Advanced options). Once the changes are made, reboot.
Remember that once you reboot, you will need to use the new hostname to login over ssh. For example, if your new hostname is mypi you would connect like this on a Mac:
ssh pi@mypi.local
On Windows you would need to change the host name in Putty to mypi.local.
Step 9. Get the latest updates
Once connected over WiFi, the next thing you should do is run some updates:
sudo apt-get update -y
sudo apt-get upgrade -y
Step 10. Keep the Pi from going to sleep
Run this command:
iwconfig
Under wlan0 you will see this line:
Power Management:on
Another way to view the power management option is with this command line:
/sbin/iw wlan0 get power_save
Which on a new system will probably return this:
Power save: on
You can turn that off using this line:
sudo /sbin/iw wlan0 set power_save off
But the problem is that when you reboot the setting will be lost.
So to make it permanent you need to do the following:
sudo nano /etc/rc.local
Above the line that says exit 0 insert the command and save the file:
/sbin/iw wlan0 set power_save off
To confirm that the setting is permanent, reboot (sudo reboot) and run iwconfig again.
Troubleshooting
Here are some helpful commands for debugging network and wifi issues on your Pi:
- This command should list your network in the first line for wlan0:
iwconfig - This command should show info for wlan0:
ifconfig - This command should list your network name:
iwlist wlan0 scan | grep ESSID - To edit or review your wifi settings, run this command:
sudo nano /etc/wpa_supplicant/wpa_supplicant.conf - To load after editing the config file (may need to login again):
sudo wpa_cli -i wlan0 reconfigure - If you keep getting a message like this when remote login:
Warning: the ECDSA host key for 'mypi.local' differs from the key for the IP address 'SOME-IP-ADDRESS'
Offending key for mypi.local in /Users/mitch/.ssh/known_hosts:54
Then try this - replace mypi.local below with your host name:
ssh-keygen -R mypi.local
Related Articles
Here is a list of my related articles that you may find interesting:
- instructions for installing the 64-bit operating system
- Raspberry Pi 4 Touchscreen Kiosk Setup
- Headless Raspberry Pi 4 External SSD Setup (Samsung T5) - my article on how to mount an external SSD using headless operations
- Headless Raspberry Pi 4 Lite Remote Desktop Upgrade - my article on how to upgrade a headless Raspberry Pi 4 lite image with a desktop and VNC server
- Headless Raspberry Pi 4 Remote Desktop VNC Setup (Mac + Windows) - in this article I show how to setup a Raspberry Pi remote desktop from scatch
- Headless Raspberry Pi 3 B+ SSH WiFi Setup (Mac + Windows) - my original article written for the Raspberry Pi 3 B+
- How to Run NodeJS on a Headless Raspberry Pi - my article on how to setup and run a NodeJS server
- Raspberry Pi Touchscreen Kiosk Setup - my article on how to use your Raspberry Pi to build a touchscreen kiosk
- ROS TurtleSim Beginner's Guide (Mac) - if you are here because you'd like to get started with robotics, check out my ROS (Robot Operating System) beginner's guide
- Headless Pi Zero W Wifi Setup (Windows) - my article on how to setup a headless Pi Zero W for Windows users
- Setup Pi Zero W Headless Wifi (Mac)- if you are Mac user with a Raspberry Pi Zero W, I have instructions for you too
- Raspberry Pi Resource Guide - checkout my resource guide for links to useful hardware
Where to buy
If you would like to use the same hardware that I used to test this article, here are some product links:
- CanaKit Raspberry Pi 4 Basic Kit (2GB)
- Amazon affiliate link - the kit contains heat sinks and a USB-C power supply with a switch that is guaranteed to work with the RPI 4.
- CanaKit Raspberry Pi 4 Basic Kit - order direct from CanaKit
- Raspberry Pi 4 Model B 2019 Quad Core 64 Bit WiFi Bluetooth (2GB)
- Amazon affiliate link
- Raspberry Pi 4 Computer Model B 4GB (Seeed - US/CN) - Seeed Studio product link
- Pimoroni Fan Shim for Raspberry PI
- Amazon affiliate link - the Pi 4 runs hot
- Pastall Raspberry Pi 4 Aluminum Case, Pi4 Case with Fan and 4 pcs Heat-Sinks, Raspberry Pi 4B Case with Fan
References
- balenaEtcher [1] - a tool that handles burning the image to the micro SD card for you
.