

Jetson Nano Power Supply (Barrel vs. Micro USB)
When you get a Jetson Nano Developer Kit, the first thing you need to figure out is how to power it. Should you use the Micro USB port with the same 5V 2.5A power supply you use on a Raspberry Pi? Or should you invest in a 5V 4A barrel jack power supply? Here's the short answer:
Power your Jetson Nano with a 5V 4A barrel jack supply. You might also want to invest in a powered USB hub to take the strain off the main power supply. This is especially true if you want to use the Nano as a desktop computer and run the advanced GPU simulations.
nvpmodel
No matter which power supply option you choose, you should first familiarize yourself with a command line utility called nvpmodel. You'll want to make sure that you have this setup properly based on your power requirements.
Whenever you startup your Nano you should query it using nvpmodel to see what model you are currently using, like this:
sudo nvpmodel -q
Using sudo may prompt you for a password, so when I ran it on my Nano I got this:
mitch@jet1:~$ sudo nvpmodel -q
[sudo] password for mitch:
NV Power Mode: MAXN
0
Verbose query
For more details you can also pass in the verbose flag, like this:
sudo nvpmodel -q --verbose
View /etc/nvpmodel.conf
The default nvpmodel configurations can be seen by dumping the contents of /etc/nvpmode.conf to the console like this:
cat /etc/nvpmodel.conf
Setting the model
I will go into detail when I discuss each power supply option, but in brief:
5 Watt Mode
If using the Micro USB you should use -m 1, also known as 5 Watt Mode:
sudo nvpmodel -m 1
10 Watt Mode
When using a 5V 4A barrel jack you should use -m 0 (that is a zero, not the letter o), also known as 10 Watt Mode:
sudo nvpmodel -m 0
How to Power a Jetson Nano
There are a number of ways to power a Jetson Nano. In this section I am only going to discuss the following:
- Micro USB power supplies
- Barrel jack 5V 4A (20W) power supplies
I will also provide a link if you want to experiment with powering the Nano using batteries.
Micro USB
I noticed the first thing people do when they get a Nano is plug in a Micro USB adapter. Usually one they used with a Raspberry Pi. Besides the convenience of having an adapter handy they also don't have to set a jumper (described later for the barrel option). This makes for a quick start - but don't go too crazy.
If you are running headless, this may be fine. But once you start plugging things into the USB ports and running the GPU intensive simulations things can become problematic. I've booted up the desktop using the Micro USB, while hooked up to a HDMI monitor, keyboard and mouse. But I kept things simple and immediately queried and setup the nvpmodel parameters.
If you do go this route, I would strongly recommend using a powered USB hub to connect all USB peripherals.
Micro USB nvpmodel settings
By default the Nano is probably in 10 Watt mode. If using a Micro USB adapter you should change that immediately to 5W mode.
sudo nvpmodel -m 1
By default, the setting should persist after reboot.
Barrel Jack (5V 4A) Power Supply
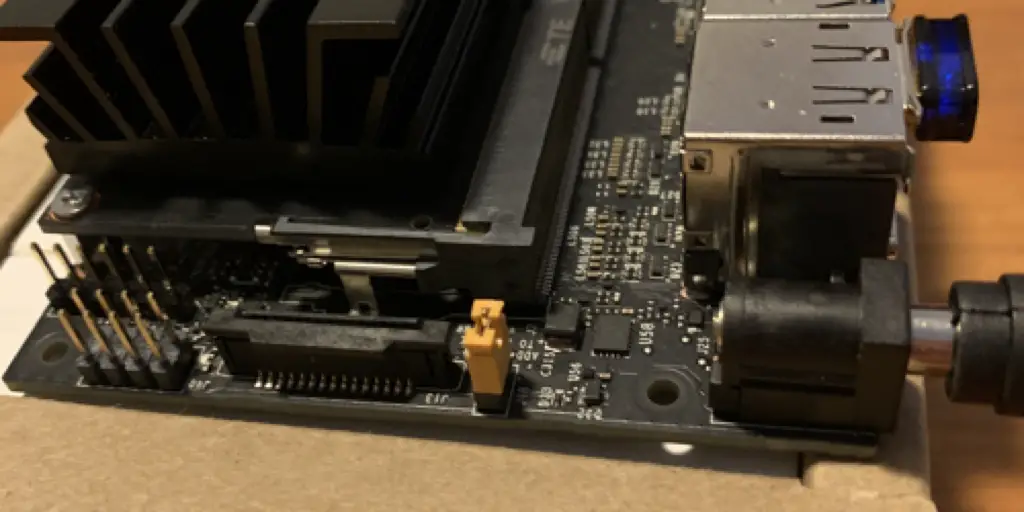
Before you can connect a 5V 4A power supply to the barrel jack on the Jetson Nano, you will need to put a jumper on J48.
For an A02 carrier board (pre-2020) J48 is the solo header next to the camera port. See the yellow jumper in the picture associated with this article.
For a B01 carrier board (2020+) J48 is a solo header behind the barrel jack and the HDMI port.
If like me, you have a 2.5mm plug on the end of your adapter, you will need a 2.1mm adapter to fit the Nano.
The power supply that I use, adapter and a set of jumpers are listed below:
- Geekworm DC 5V 4A Power Adapter with EU/US Plug DC 5.5x2.5
- requires 2.5 to 2.1 adapter (below)
- OMNIHIL Adapter Plug Converter 5.5mm x 2.5mm Female Plug to 5.5mm x2.1mm Male Plug
- Gikfun 200pcs 2.54mm Standard Computer Jumper Caps Short Circuit Cap Mini Micro Jumper Bridge Plug DIY Kit for Arduino (Pack of 200pcs) EK1928
5V 4A nvpmodel settings
When using the barrel jack to connect a 5V 4A (20W) power supply, you should set the Nano into 10 Watt mode to allow maximum power usage.
First, query the nvpmodel to see if it is set to max power already:
sudo nvpmodel -q
If the query returns MAXN then you are all set.
NV Power Mode: MAXN
If not, you can set maximum power using this command:
sudo nvpmodel -m 0
As with the other model, the setting should by default persist after reboot.
<ins class="adsbygoogle"
style="display:block; text-align:center;"
data-ad-layout="in-article"
data-ad-format="fluid"
data-ad-client="ca-pub-3173825420907807"
data-ad-slot="7023774782">
Battery Power
Powering a Nano by battery requires a long list of considerations that are beyond the scope of this article. I would suggest that you look at an example like the NVIDIA Kaya robot project.
tegrastats
A useful utility for monitoring your Jetson Nano is tegrastats. It should be installed by default. It lets you monitor temperature and power usage.
To use it, run the following at the command line:
sudo tegrastats
Example output:
mitch@jet1:~$ sudo tegrastats
[sudo] password for mitch:
RAM 1035/3965MB (lfb 372x4MB) IRAM 0/252kB(lfb 252kB) CPU [4%@102,6%@102,1%@102,0%@102] EMC_FREQ 2%@204 GR3D_FREQ 0%@76 APE 25 PLL@30C CPU@32C PMIC@100C GPU@29.5C AO@37C thermal@30.75C POM_5V_IN 1036/1036 POM_5V_GPU 41/41 POM_5V_CPU 124/124
The last line of data will update every second until you press Ctrl-C. If you want to keep it running, just leave it open in a second terminal window.
For information on what the various values mean, see: tegrastats Utility in the NVIDIA Tegra Linux Driver Package documentation.
Jetson Stats
Another utility that works at the command line is Jetson Stats.
See: github.com/rbonghi/jetson_stats
Install Jetson Stats
sudo apt-get install python3-pip
sudo pip3 install -U pip
sudo -H pip install -U jetson-stats
Run Jetson Stats
sudo jtop
This will create a display of information on the state of the Nano.
Press q (as in quit) to exit.
Conclusion
Even though you can power a Jetson Nano using a Micro USB adapter, I would strongly recommend using a 5V 4A barrel jack power supply. Then immediately put it into 10W mode. Then use the utilities referenced in this article to setup and monitor the performance of the device.
Related Articles
Here is a list of additional articles that I've written on how to use the Jetson Nano:
- Jetson Nano USB Login - In this article I show you how to connect and login to an NVIDIA Jetson Nano using a special USB serial cable.
- Jetson Nano USB Headless WiFi Setup (Edimax-EW-7811UN) - The easiest way to setup a Jetson Nano for headless WiFi is to use a USB adapter. The EdiMax EW-7811Un is popular for use with the Raspberry Pi. It can also be used with a Nano, but requires a command line setting to get it to act reliably. In this article I show you how to set it up
- How to add a dual WiFi Bluetooth card to a Jetson Nano (Intel 8265) - In this post I show advanced users how to upgrade to an Intel Dual Band Wireless card that will also provide Bluetooth functionality
- My frequently updated Jetson Nano Resource Guide - check it out if you need things like a wireless keyboard and trackpad that fits into a pocket