
Jetson Xavier NX Headless WiFi Setup
In this article I show you how to perform a headless WiFi setup of a Jetson Xavier NX. No monitor, keyboard or mouse required.
In order for these steps to work, you should be using a recent version of JetPack.
Step 1. Gather the parts
For the steps in this article you will need the following:
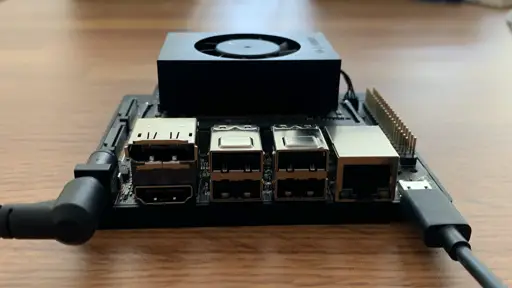
- Jetson Xavier NX Development Kit (includes power supply and network card)
- Micro USB cable (like this one):
- SD Card (64GB or 128GB)
Step 2. Download the Jetson Xavier SD card image
This article was tested on the first edition of the Jetson Xavier NX using this image:
- Jetson Xavier NX Developer Kit SD Card Image
- JetPack 4.4
- 2020/05/14
You can download it from here:
Step 3. Flash the image to the SD card
Flash the image to the SD card using balenaEtcher.
I recommend using at least a 64GB card, such as this one:
Once the image is flashed to the hard-drive, you may see a message like I did on my Mac that says The disk you inserted was not readable by this computer. In that case, click Eject.
Remember that on a Mac this isn't a physical eject. It's a software eject. Which means it's safe to pull the SD card and its adapter out of your computer.
{% include google-article.html %}
Step 4. Insert the microSD card
- Insert the microSD card into the Jetson Xavier NX.
The microSD card goes in the back, just under the heatsink. If you are looking down on the device the contacts must be face up.
The card reader has a spring so you have to gently push the card info the device. Make sure you don't bend the nearby header pins.
The plastic base may get in the way, requiring tweezers to insert the card. Try not to squeeze or damage the contacts.
Step 5. Connect the Micro-USB cable
- Use a cable from a Raspberry Pi or an Android phone or buy one like this:
- Plug the Micro-USB cable into the Jetson Xavier NX
- Plug the other end into your computer or laptop
Step 6. Plug in the power jack
- Plug one end of the Jetson Xavier NX power supply into the barrel jack on the device (do not use anything but the official 19V power supply!)
- Plug the other end into a wall socket or power strip
Step 7. Wait for the Jetson Xavier NX to boot up
- Wait for a drive to appear on your desktop
- It may be labeled LT4-README.
Step 8. Look for the new device
- On a Mac in a terminal window type the following:
ls -ls /dev/cu.*
- You should see a device like this (the trailing numbers may not be an exact match):
/dev/cu.usbmodem14210200096973
If you see multiple devices that start with /dev/cu.usbmodem, unplug the Micro-USB cable from the Xavier NX so you can figure out which one it is.
Step 9. Connect over USB
If you have only one device you can connect to the Jetson Xavier NX from the terminal using this command:
screen /dev/cu.usbmode* 115200 -L
If you had multiple devices, replace the wildcard with the full name.
Step 10. Fill in the config info
{% include google-article.html %}
You should now see a screen like this:
System Configuration

 ┌────┤ License For Customer Use of NVIDIA Software ├─────┐
 │                                                        │
 │ Welcome to Jetson Initial Configuration                │
 │                                                        │
 │                         <Ok>                           │
 │                                                        │
 └────────────────────────────────────────────────────────┘
- If Ok isn't highlighted, press Tab
- Press Enter
- Accept the license agreement (Press Tab / Enter)
- Select your language (in my case English / Tab / Enter)
- Select your country (in my case United States / Tab / Enter)
- Select your timezone (in my case Eastern / Tab / Enter)
- Select UTC (the recommendation is to select Yes / Enter)
- Select a new user name (in my case mitch / Enter)
- Select a password (enter something unique then Enter)
- Confirm the password (enter it again, then press Enter)
- APP Partition Size (I use the recommended default)
Network configuration
* If you aren't concerned about networking right now, select dummy0: Unknown interface (note that DHCP will fail later, but you can skip that)
* If you are using the network card that arrived already installed in the chassis select wlan0: Wireless ethernet (802.11x)
* For Wireless ESSID for wlan0 enter your network name
* In my case for Network configuration I selected WPA/WPA2 PSK
* When prompted enter the pass phrase for your network
* For hostname, backout the default string and enter your desired hostname (I chose jet3)
At this point you will be prompted to login with your username. But the connection may be in a weird state after you are done with the configuration. The easiest thing to do is to just kill the current Terminal window and open up a new one.
Note: When trying to setup networking on one attempt I ran into a failure. I tried again with the exact same credentials and it succeeded.
If you are still having issues with networking, try a USB WiFi adapter like this:
Step 11. Login over USB
- Open up a new Terminal window
- Connect over USB again:
screen /dev/cu.usbmode* 115200 -L
- Login using your new username and password
- Make sure you can see some files:
ls -ls
Step 12. Shutdown the Jetson Xavier NX
- Run this command to shutdown the Jetson Xavier NX:
sudo shutdown -h now
- Enter your password for the Xavier NX
- Wait for the lights on the Xavier NX to go out
- Disconnect the barrel jack power connector
- Disconnect the micro USB cable
A this point you can put away the micro-USB connector. You won't need it for the rest of this article.
Step 13. Test over WiFi
You may find that after the last step your Terminal window is again in a weird state.
Just close it and open up a new one.
- Plug the barrel power jack back into the Xavier NX
- Wait a minute or two for it to boot up
- From a laptop on the same network login over WiFi via ssh
Since my user name is mitch and my Jetson Xavier NX hostname is jet3, I would login like this (adjust for your username and hostname):
ssh mitch@jet3.local
If you get a warning
Because I run through these steps multiple times using the same hostname, I sometimes get a warning like this:
- WARNING: REMOTE HOST IDENTIFICATION HAS CHANGED!
You may see it too if you are trying again with the same hostname.
If you see that error, try this (substituting YOUR-HOSTNAME):
ssh-keygen -R YOUR-HOSTNAME.local
Then try the login again.
Step 14. Run some updates
At this point it’s a good idea to run some updates. You can do that by entering the commands below on the Xavier NX.
sudo apt-get update
sudo apt-get upgrade
Step 15. Create a swap file
I borrowed these swap file steps from the JetBot wiki.
sudo fallocate -l 4G /var/swapfile
sudo chmod 600 /var/swapfile
sudo mkswap /var/swapfile
sudo swapon /var/swapfile
sudo bash -c 'echo "/var/swapfile swap swap defaults 0 0" >> /etc/fstab'
Step 16. Turn on the fan
To see the current status:
sudo /usr/bin/jetson_clocks --show
To run the fan:
sudo /usr/bin/jetson_clocks --fan
Step 17. Shutdown properly
Once you are done, you can shut down the Jetson Xavier NX with this command:
sudo shutdown -h now
Conclusion
In this article you learned:
- what hardware is required to perform a headless WiFi setup
- how to connect from your computer to a brand new Jetson Xavier NX
Related Articles
Here is a list of additional articles that I've written up for the Jetson family:
- Jetson Xavier NX NVMe SSD Setup
- Jetson Xavier NX Jupyter Setup (Docker)
- Jetson Nano USB Headless WiFi Setup (Edimax-EW-7811UN) - The easiest way to setup a Jetson Nano for headless WiFi is to use a USB adapter. The EdiMax EW-7811Un is popular for use with the Raspberry Pi. It can also be used with a Nano, but requires a command line setting to get it to act reliably. In this article I show you how to set it up
- How to add a dual WiFi Bluetooth card to a Jetson Nano (Intel 8265) - In this post I show advanced users how to upgrade to an Intel Dual Band Wireless card that will also provide Bluetooth functionality