
PCA9685 Servo Driver with Seeeduino Nano (Arduino Compatible)
How can you drive servo motors with a Seeeduino Nano (Arduino compatible) ?
To drive several servo motors with any Arduino you can use the popular PCA9685 16 Channel PWM Servo Motor Driver I2C Module. By using a Seeeduino Nano you can do it more easily using it's built in I2C Grove connector.
This project can also work with a regular Arduino Nano. I will cover that as well.
The first thing that you need to do is gather the parts.
Step 1. Parts list
Here is a list of the parts that you will need for this project:
You can either use a Seeeduino Nano (Option 1) or an Arduino Nano (Option 2).
Seeeduino Nano
| Part | Vendor |
|---|---|
| Seeeduino Nano (Option 1) | Seeed |
| The Seeeduino doesn't come with a cable. It requires a USB-C connector. Select either a USB-C or a USB-A below. | |
| USB Type-C to USB Type-C 2.0 Charger Cable Select if your laptop has a USB-C connector |
Amazon |
| USB Type-C to USB-A 2.0 Male Charger Cable Select if your laptop has a USB-A connector |
Amazon |
| Arduino Nano with USB Cable (Option 2) Comes with a cable |
Walmart |
| Grove Shield for Arduino Nano (Option 2) Required if you are using a standard Arduino Nano |
Seeed |
| PCA9685 PWM Servo Motor Driver (Pack of 3) | Amazon |
| SG90 9G Servo Motor Kit (10 pcs) | Amazon |
| Grove 4 Pin Conversion Cable | Amazon |
External Power Supply
You will also need an external power supply. You can power the servo board directly from the Seeeduino. But for the motors you should use an external power supply.
You have at least these three options:
- Option 1: Battery pack producing 4.8 to 5v
- Option 2: DC adapter that produces 4.8 to 5v (check with a multimeter!)
- Option 3: Variable power supply that can produce between 4.8 to 5v
I use this power supply: Dr.Meter PS-305DM 30V/5A Single-Output DC Power Supply 110V/220V Switchable, Alligator clip included, US 3-prong Cable (Amazon)
Step 2. Setup the Nano
This project works with either a Seeeduino Nano or an Arduino Nano
Seeeduino Nano
If you have never used the Seeeduino Nano with the the Arduino IDE before, see my setup guide:
- Seeeduino Nano Grove Setup (desertbot.io)
If you are using a Seeeduino Nano, skip to the next section.
Arduino Nano
These instructions are for regular Arduino Nano hooked up to a Mac. Adapt for Windows:
In the Arduino IDE, select the following:
- Tools > Port > /dev/cu.usbserial-1410
- Tools > Board > Arduino Nano
Step 3. Unplug everything
In the next few steps you will be wiring things up. To make sure you don't accidentally short anything out, unplug all components from power supplies, etc.
Step 4. Wire the Grove Cable to the PCA9685
The Seeeduino Nano can communicate with the PCA9685 over I2C. It has a built in Grove (Molex-like) connector on top wired for I2C communication. The PCA9685 just has a series of header pins on the side. So you need to use a Grove 4 Pin Conversion Cable to create a connection.
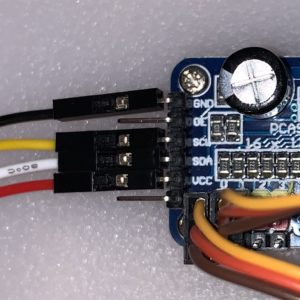
Connect the following from the Grove conversion cable to the PCA9685:
- Black Wire - GND
- Yellow Wire - SCL
- White Wire - SDA
- Red Wired - VCC
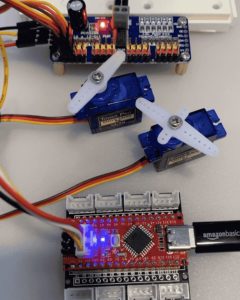
Seeeduino Nano
Plug the other end of the conversion cable into the I2C port on top of the Seeeduino Nano.
Arduino Nano
Plug the other end of the conversion cable into the I2C port on the Grove Shield (you can use that port instead for a Seeeduino Nano too).
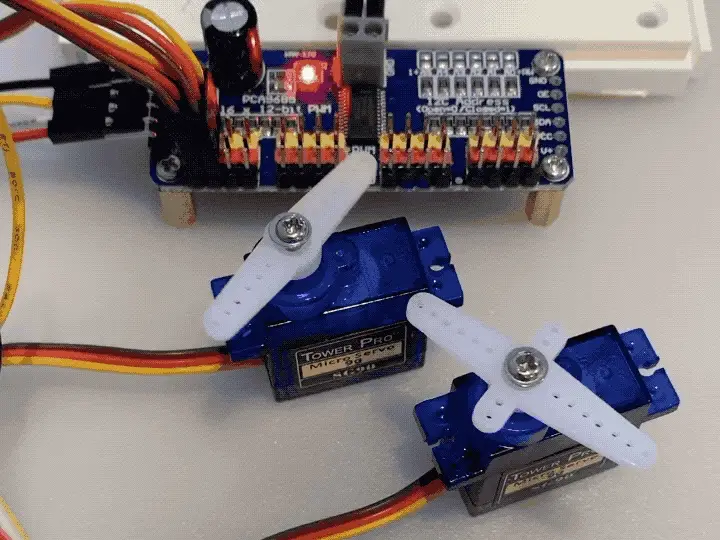
Step 5. Plug in the servos
If you are using standard SG90 servos and the board I recommended, the color codes of the servo wires should match the color of the pin connectors on the board.
- Plug the servos in, matching the colors of the connectors to the colors of the wires
- Put the first servo in the plug labeled 0, then 1, etc.
Step 6. Wire 5V DC power cables to the PCA9685
On the board that I recommended, there is a green power block.
You will need a small or eyeglass screwdriver to turn the screws.
- Put a red wire in the green connector labeled Power / V+
- Put a black wire in the green connector labeled GND
- If you are using a power supply turn it off
- If you are using a battery pack with no switch, remove the batteries
- Wire the red (+) and black (-/Ground) wires to your power supply
Step 7. Connect the Nano to your PC or Mac
You need a connection with your computer to push code to either Nano.
Seeeduino Nano
- Plug the cable recommended in the parts list into the Seeeduino Nano and your Mac or PC
Arduino Nano
- Plug the cable that came with the board I recommended in the Arduino Nano and your Mac or PC.
Step 8. Turn on the power supply
- Don't be alarmed if the servos jump
- Make sure the servo "horns" are clear of hitting anything, especially wires
- Turn on your power supply or put the batteries in their holder
Step 9. Setup the IDE
Install the library and examples
- Launch the Arduino IDE
- Select Tools > Manage Libraries ...
- Search the libraries for "Adafruit pwm"
- Install the Adafruit PWM Servo Driver Library
Run the Servo example
- Select File > Examples > Adafruit PWM Servo Driver Library > servo
- Upload the example to the Seeeduino Nano
The motors should go through a sequence proving that it works!
Cleaning up the example
You can clean up the example by changing the count in this line:
if (servonum > 7) servonum = 0; // Testing the first 8 servo channels
If you have only two servos, wired to the first two ports (0 and 1) on the PCA9685, change the 7 above to 1. That will cause the code to loop through only your available servos faster.
The rule is that if you have X number of servos, change the 7 above to whatever X - 1 equals.
Conclusion
In this article I showed you how to drive a series of servo motors with an Arduino compatible board and an actual board. The example uses the popular PCA9685 servo driver board. Because the servo board communicates using I2C, it works with many single board computers. This list includes Arduino, Seeeduino, ESP32, Raspberry Pi and Jetson Nano.
To simplify the wiring, I showed you how to put together a project using an Arduino Nano clone that has a built in I2C Grove connector. I also showed you how to use a Grove Shield to work with a regular Arduino Nano.
With one board you can drive up to 16 servos. You could use it to drive your next robot or robotic component. For example a laser cut robot arm or a hexapod (spider like robot). The only limit is your imagination.