
Raspberry Pi Jupyter Headless Setup with GPIO Examples
This article covers setting up a headless Raspberry Pi as a Jupyter Notebook server. It also provides examples of how to use the GPIO to read a button and control an LED from within a Jupyter Notebook. This is sometimes referred to as physical computing.
If you'd like to know how I setup the headless image before I added Jupyter, I've provided some links at the end of this article. The image I've setup has ssh enabled so I can remotely log into it.
Step 1. Remote login to the Raspberry Pi
Remote into the Raspberry Pi:
- Open up a terminal / command line window on your computer
- Perform an ssh login to access your Raspberry Pi
- For example (substitute mypi with your Pi's hostname):
ssh pi@mypi.local
Step 2. Enable interfacing options
From within the Pi:
- Launch
sudo raspi-config - Under Interfacing options enable the following:
- Camera
- I2C
You will be prompted to reboot.
Step 3. Switch mirrors (optional)
For the steps that follow I had trouble finding packages when I ran apt-get. In my case I needed to switch my system to another mirror of the resources.
You can try the same or just skip to the next step and see if it works (if not, come back to this step).
To switch mirrors I did the following:
- Find a mirror near you:
- Browse to: https://www.raspbian.org/RaspbianMirrors
- Edit the sources.list file:
sudo nano /etc/apt/sources.list
- Comment out the current top line
- Insert this line at the top (sub with a reliable mirror near you):
deb http://mirror.umd.edu/raspbian/raspbian buster main contrib non-free rpi
- Verify the mirror is now being used:
sudo apt-get update
Note that it is now connecting to the mirror:
Get:1 http://mirror.umd.edu/raspbian/raspbian buster InRelease [15.0 kB]
Step 4. Install python libraries
To install the python libraries needed to run Jupyter, run the following commands:
sudo apt install python3-pip python3-pil
sudo pip3 install --upgrade numpy
sudo apt-get install python-rpi.gpio python3-rpi.gpio
sudo apt-get install python-picamera python3-picamera
sudo pip3 install jupyter
jupyter nbextension enable --py widgetsnbextension
Step 5. Setup a password
To secure Jupyter, setup a password:
jupyter notebook password
If you lose your connection, close the terminal window and try another one.
Step 6. Run Jupyter
On your Pi, do the following:
jupyter notebook --no-browser
On your laptop, do the following:
* Run this in a terminal window (adjust for your hostname):
ssh -N -f -L localhost:8888:localhost:8888 pi@mypi.local
- Open up a browser (I'm using Chrome)
- Browse to: http://localhost:8888
- Enter the Jupyter password
You should now be looking at the tree (folder) view.
Step 7. Create a test notebook
In Jupyter, do the following:
- On the right side of the browser view, click the New dropdown
- Under Notebook: select Python 3
- In the header click Untitled and rename the notebook to Hello
- In the new cell enter the following Python code:
print("Hello World!")
- In the toolbar, click Run
The output should be printed under the cell.
At this point you have Jupyter working and you can start creating new notebooks.
But if you would like to test the hardware interaction, proceed on to the next few steps.
Test 8. Test GPIO with a button
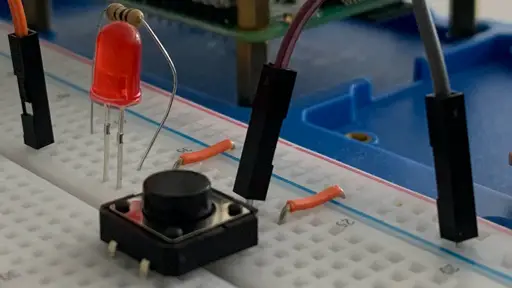
To test interaction with hardware using this example, you will need a button (preferably a momentary contact button).
- You may want to shutdown the Pi for this to avoid accidentally shorting it
- Wire a momentary contact button between Pin 6 (GND) and Pin 16 (GPIO23)
- Once done, remote back into the pi, restart Jupyter and reconnect over ssh
- Create a new notebook called push_button
- Add the code below to a new cell
- Run the code and then push the physical (momentary contact) button
- the program should print some messages then exit
- To stop the program without pressing the physical button:
- click the button in the tool bar that looks like a stop button
- or from the menu select Kernel / Interrupt (which does the same thing)
#!/usr/bin/python3

import RPi.GPIO as GPIO
from time import sleep

# Button: GND (Pin 6), GPIO23 (Pin 16)

buttonPin = 16

GPIO.setmode(GPIO.BOARD)
GPIO.setwarnings(False)

# pull up using internal resistor
GPIO.setup(buttonPin, GPIO.IN, pull_up_down=GPIO.PUD_UP)

print("Press the physical button or:")
print("Select: Kernel / Interrupt or Jupyter tool bar button to stop")

pushed = False

try:

  while True:
    sleep(0.1)  # Give the CPU a break
    if GPIO.input(buttonPin) == GPIO.LOW:
      if not pushed:
          pushed = True
          print("LOW")
          break
    else:
      pushed = False

except KeyboardInterrupt:
    print("\nInterupt detected")

print("Button pressed? " + str(pushed) )
print("Click inside code block to run again")
Test 9. Test GPIO with an LED
To test interaction with hardware using this example, you will need an LED and a 100 ohm resistor, jumper wire and a breadboard.
- You may want to shutdown the Pi for this to avoid accidentally shorting it
- Wire in series an LED with a 100 ohm resistor between Pin 6 (GND) and Pin 8
- The cathode (shorter lead) of the LED should connect to ground (GND)
- The anode (longer lead) should connect to a 100 ohm resister that connects to Pin 8
- Once done, remote back into the pi, restart Jupyter and reconnect over ssh
- Create a new notebook called led_flash
- Add the code below to a new cell
- Run the code and the led should start flashing
- To stop the program, click the button in the tool bar that looks like a stop button
- or from the menu select Kernel / Interrupt (which does the same thing)
#!/usr/bin/python3

import RPi.GPIO as GPIO
from time import sleep

# Led:
# Cathode (-) to GND (RPi Pin 6),
# Anode (+) (longer lead) to 100 ohm resistor
# Other end of resitor to (RPi Pin 8)

ledPin = 8
delay = 0.5

GPIO.setmode(GPIO.BOARD)
GPIO.setwarnings(False)

GPIO.setup(ledPin, GPIO.OUT, initial=GPIO.LOW)

print("Select: Kernel / Interrupt or tool bar button to stop")

try:

  while True:
    GPIO.output(ledPin, GPIO.HIGH) # Turn on
    sleep(delay)
    GPIO.output(ledPin, GPIO.LOW)  # Turn off
    sleep(delay)

except KeyboardInterrupt:
  print("Interrupt detected")

print("Turning off LED")
GPIO.output(ledPin, GPIO.LOW)  # Turn off
print("Click inside code block to run again")
Troubleshooting
If the ssh command says the port is in use, try this (tested on a Mac):
lsof -ti:8888 | xargs kill
Conclusion
In this article you learned how to:
- Install Jupyter on a headless Raspberry Pi
- Create a notebook in Jupyter
- Create Jupyter notebooks that interact with the hardware
Related Articles
- Headless Raspberry Pi 4 SSH WiFi Setup (Mac + Windows)
- Raspberry Pi Resource Guide - checkout my resource guide for links to useful hardware