
How to blink a Seeeduino XIAO onboard LED (Windows, 7 Steps)
In this article I show you how to blink the onboard LED of a Seeeduino XIAO board. These instructions were written using a Windows 10 Home laptop (click here for the Mac version).
To blink the onboard LED of a Seeeduino XIAO board you can program it like an Arduino board. Once you add support for the board to the Arduino IDE, you can write and run a simple blink example.
In the steps below, I will show you how to do that.
Where to buy
You can buy a Seeeduino XIAO from Amazon in the US using my affiliate link (this link is for a 3 pack):
The Seeeduino XIAO has a USB-C connector. So to connect it to your PC you will need one of these cables:
- USB Type-C to USB Type-C 2.0 Charger Cable - Select if your laptop has a USB-C connector
- USB Type-C to USB-A 2.0 Male Charger Cable - Select if your laptop has a USB-A connector
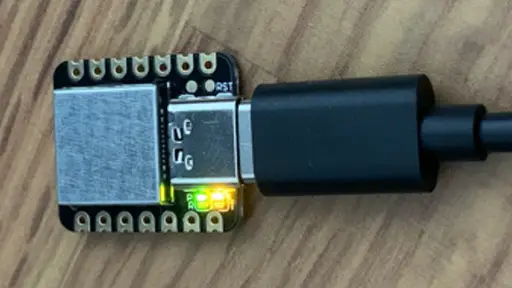
Step 1. Plug the Seeeduino XIAO into your Windows machine
The first thing that you need to do is plug the Seeeduino XIAO board into your Windows machine. The board will be powered by the USB cable for this example. So you won't need an external power supply.
- Plug the USB cable into your laptop or PC
- Plug the USB cable into your Seeeduino XIAO board
- Confirm the power LED on the board is on (on my board it is a green LED)
- Depending on how your board was configured by default an onboard LED may be blinking too
- On my board the onboard LED is yellow
Step 2. Download the Arduino IDE
This article was tested using the Arduino IDE version 1.8.15.
- Browse to: https://www.arduino.cc/en/Main/Software
- Download the IDE for your operating system
Windows Instructions
There may be multiple versions for Windows listed. I suggest downloading the *.exe installer. Currently that is the one labeled “Win 7 and newer.” If you see different labels, wave your mouse over each of them and pick the one whose link ends with exe.
- You should see the downloaded file in the footer of your browser
- Click on it and select Show in Folder
- If not, you can find the file in File Explorer in the Downloads folder in your user directory
- To install, run the executable – it will be labeled something like arduino-1.8.15-windows.exe depending on what version you downloaded
- During installation you will be prompted to approve various steps along the way – if the requests sound reasonable, click Yes
- If you are prompted to accept terms, you may read them and assuming that you are fine with them, click I Agree
- When prompted for what components to install I would recommend installing all of them
- This will install the Arduino software, USB driver, Start Menu and Desktop shortcuts and associate .ino files with the Arduino IDE, etc.
- Depending on how your Windows machine was setup and what version you have, the Arduino software will default to being installed in
C:\Program Files (x86)\Arduino\ - Once the installation has finished, click Close
Step 3: Configure the Arduino IDE for Seeeduino boards
- Start the Arduino IDE by double clicking on the desktop icon
- From the File menu select Preferences...
- For Additional Board Manager URLs enter in the field on its own line:
https://files.seeedstudio.com/arduino/package_seeeduino_boards_index.json
- Select from the Tools menu Board: * > Boards Manager...
- Type in Seeeduino XIAO
- You should see a listing for Seeed SAMD Boards
- Click Install
- Click Close
Step 4. Select your board and port
To select the board:
- Select Tools > Board: *
- Select Seeed SAMD (...) Boards
- Select Seeed XIAO
If you can’t find the board, make sure you entered the correct Board Manager URL.
To select the port:
- Select Tools > Port: *
- Select COM3 (Seeeduino XIAO)
Depending on your machine, you may see a different COM port for the Seeeduino XIAO. If that’s the case, select the different port.
Step 5: Paste the code into the IDE
Paste the code below into the IDE window. It's based on the generic Arduino blink example.
You can completely replace any existing example or setup code that is already there:
// the setup function runs once when you press reset or power the board
void setup() {
  // initialize digital pin LED_BUILTIN as an output.
  pinMode(LED_BUILTIN, OUTPUT);
}

// the loop function runs over and over again forever
void loop() {
  digitalWrite(LED_BUILTIN, HIGH);   // turn the LED off (HIGH is the voltage level)
  delay(5000);                       // wait for a long time while the LED remains off
  digitalWrite(LED_BUILTIN, LOW);    // turn the LED on by making the voltage LOW
  delay(250);                        // wait for a short time to briefly light the LED
}
Code description
- The setup function sets up the onboard LED as an output pin, so it can be turned on and off
- The loop repeatedly turns the LED off and on by toggling the voltage level between HIGH and LOW
- Delays are used to control how quickly the LED turns off and onn
Unlike some boards, setting the LED pin HIGH turns off the onboard LED.
Setting the LED pin LOW turns on the onboard LED.
Step 6: Upload the code to the Seeeduino XIAO
- Click the Upload button (the right pointing arrow in the IDE tool bar)
Step 7: Verify it works
- Verify that you see the onboard LED blinking on and off
On my board the LED is yellow.
The LED should blink like this:
- LED off for 5 seconds while the builtin LED pin is HIGH
- LED on for 250ms while the builtin LED pin is LOW
Troubleshooting
- If the text in the editor is grayed out and you can’t edit, in Preferences make sure to uncheck Use external editor
- Also in Preferences, verify the Sketchbook location looks like a valid path
- If you get a CRC error while installing the Seeeduino board package, you may need to delete
(User)\AppData\Local\Arduino15\staging - The AppData folder is hidden and you have to type into the run window %AppData% to find it
- If that still doesn’t work, completely uninstall Arduino, delete the staging folder and try again
Next step
You can experiment with this simple example by changing the delay values and uploading new code to the device. Make the delay different enough so that you can confirm that your changes are working.
Conclusion
In this article you learned how to:
- Connect a Seeeduino XIAO to your PC
- Setup and install Arduino IDE support for the board
- Set the Arduino IDE board and port to work with the board
- Upload and run an example to blink the onboard LED
Related articles
See my related articles, where I show how to blink the LED for other types of Arduino boards.
- How to blink a Seeeduino XIAO onboard LED (Mac, 7 Steps)
- How to blink a D1 Mini onboard LED (Mac)
- How to blink an ESP32 onboard LED (Mac)
- Seeeduino Nano Grove Setup (Arduino Compatible)
References
- Seeeduino XIAO - Arduino Microcontroller - SAMD21 Cortex M0+ - Seeed Studio [1]