
Seeeduino Nano Grove Setup (Arduino Compatible)
Arduino is an open-source electronics platform. That allows companies like Seeed Studio to create their own special versions called Seeeduinos.
In this article I'll cover the following:
- Seeeduino Nano vs. Arduino Nano
- Setting up the Seeeduino Nano
- Adding Seeeduino support to the Arduino IDE
- Interacting with Grove Components
- Using the Grove Shield for Arduino Nano
Seeeduino Nano vs. Arduino Nano
Both devices are pin compatible. There are only a few main differences:
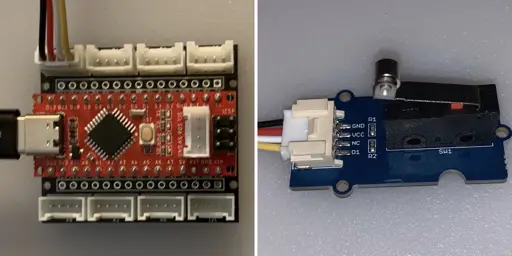
- The Seeeduino uses a USB-C connector
- The Seeeduino has a built in Grove I2C connector
Both devices should work with the Grove Shield for Arduino Nano. But I've only tested it with the Seeeduino.
USB-C to USB-A cable
If you have a laptop or PC that uses a standard USB-A connector, you will need a cable like this to connect to the Seeeduino Nano:
I tested this article using this cable:
Setting up the Seeeduino Nano
Step 1. Hardware requirements
- Plug the USB cable into your laptop
- Plug the USB cable into your Seeeduino Nano
- Confirm lights on the board are flashing
Step 2. Download the Arduino IDE
This article was tested using the Arduino IDE version 1.8.10.
- Browse to: https://www.arduino.cc/en/Main/Software
- Download the IDE for your operating system
Mac Instructions
- Double click the *.zip file to extract the application
- Copy the Arduino app to the Applications folder
Step 3. Add the Seeeduino boards to the IDE
This step was adapted from: http://wiki.seeedstudio.com/Seeed_Arduino_Boards/
- Open your Arduino IDE
- If using a Mac:
- Select: Arduino > Preferances
- If using Windows:
- Select: File > Preferences
- Paste the URL below into Additional Boards Manager URLs
https://raw.githubusercontent.com/Seeed-Studio/Seeed_Platform/master/package_seeeduino_boards_index.json
- Click: OK
- Select: Tools > Board > Boards Manager...
- Search on: Seeed Nano
- Click: Install
- It may take a moment and seem to stall, but should succeed
- Click: Close
Step 4. Select the Seeed Board
- Select: Tools > Board > Seeeduino Nano
Step 5: Select the Port
These are instructions that worked on my Mac:
- Select: Tools > Port > /dev/cu.SLAB_USBtoUART
Step 6: Run the Blink example
Most Arduino boards have an onboard LED wired to pin 13. Uploading an example program to make it blink is a good intro to programming the device. It's also useful to make sure things are working properly.
- Select: File > Examples > 01. Basic > Blink
- Click the Upload button (->) in the toolbar at the top of the IDE
- The onboard LED should start blinking
If you look at the setup function you will see this code:
// the setup function runs once when you
// press reset or power the board
void setup() {
  // initialize digital pin LED_BUILTIN as an output.
  pinMode(LED_BUILTIN, OUTPUT);
}
On startup the builtin LED will be set as an output. This will allow it to be turned on and off by code.
In the loop function you will see a few lines like this:
delay(1000);
The delay value in in milliseconds. So 1000 = 1 second.
Experiment with changing the values, then click the Upload button and notice the results.
The main loop looks like this:
void loop() {
  // turn the LED on (HIGH is the voltage level)
  digitalWrite(LED_BUILTIN, HIGH);
  delay(1000);    // wait for x milliseconds
  // turn the LED off by making the voltage LOW
  digitalWrite(LED_BUILTIN, LOW);
  delay(1000);    // wait for a second
}
If you change the first delay it will affect how long the LED stays on.
If you change the second delay it will affect how long the LED stays off.
You can find more information on the Blink example here:
Grove Connector
Seeed offers a variety of electronic components that are part of their Grove toolset. Instead of having to figure out which pin to put a jumper in, and wiring up resistors, etc on a breadboard, you can just plug in the connector.
Behind the scenes Grove connectors map to the various types of interfaces available on an Arduino: Digital, Analog, I2C, PWM, etc.
The Seeeduino Nano comes with one built in Grove I2C connector. This makes it easy to add things like small I2C LCD displays and I2C motor drivers. There are a few available I2C components with Grove connectors available for sale on the Seeed Studio site.
You can add more connector types to the Nano using the Grove Shield for Arduino Nano.
Grove Shield
For a beginner, setting up an I2C project in the IDE is a bit involved. So to keep things simple I'm just going to show a simple Grove digital component example.
For this section you will need:
A simple digital switch example
- Plug the Nano into the Shield
- Make sure the USB connector is lined up with the drawing on the shield!
- Plug the Grove Micro-switch into the D2 Digital Grove connector on the shield
- Plug the USB cable into your laptop or PC
- Plug the other end of the USB cable into the Nano
- In the Arduino IDE select:
- File > Examples > 02. Digital > Button
- Upload the code to the Nano
- Tap the switch and the LED should come on
You can find out more about the Button example here:
How to determine which Grove port to use
At the top of the example you will see this constant defined:
const int buttonPin = 2; // the number of the pushbutton pin
In the setup function, pin 2 is initialized as an input with this code:
  // initialize the pushbutton pin as an input:
  pinMode(buttonPin, INPUT);
This is the main loop:
void loop() {
  // Read the state of the pushbutton value:
  buttonState = digitalRead(buttonPin);

  // Check if the pushbutton is pressed.
  // If it is, the buttonState is HIGH:
  if (buttonState == HIGH) {
    // turn LED on:
    digitalWrite(ledPin, HIGH);
  } else {
    // turn LED off:
    digitalWrite(ledPin, LOW);
  }
}
- The state of the micro switch is read
- If the switch is pressed (HIGH) the LED is turned on
- When the switch is not being pressed (LOW) the LED is turned off
Where to get more components
One way to get your hands on several Grove components at once is to get the Grove Beginner Kit for Arduino - Seeedstudio.
It contains several Grove components, including an I2C LCD and a link to instructions.
It also comes with a Seeeduino Lotus. It's like an Arduino UNO with several Grove connectors built in.
Disclaimer
Seeed Studio contacted me and asked if I would review the Seeeduino Nano. They also offered me a coupon to buy the device, which I used to buy some extra parts too. But they had no say or preview related to the content of this article.
Related Articles
- How to Build an Arduino Uno Robot (Free Course)
- PCA9685 Servo Driver with Seeeduino Nano (Arduino Compatible)
- Arduino Resource Guide