
Headless Raspberry Pi 4 External SSD Setup (Samsung T5)
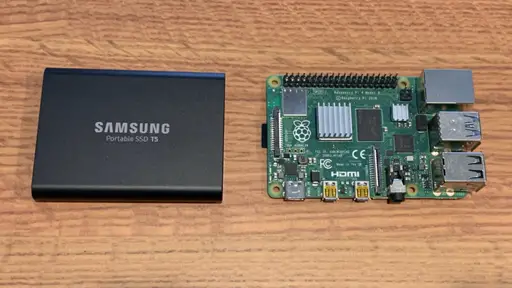
In this article I'm going to show you how to mount a Samsung T5 2TB External SSD to a Raspberry Pi 4 using headless, command line operations.
To test this article, I used a Samsung T5 2TB SSD, which you can find by following my affiliate links:
| Samsung T5 Portable SSD - 2TB - USB 3.1 External SSD (MU-PA2T0B/AM), Black | Walmart
| Samsung T5 Portable SSD - 2TB - USB 3.1 External SSD (MU-PA2T0B/AM), Black | Amazon
If you'd like to know how I setup the lite image for testing, I've provided some links at the end of this article. The image I've setup has ssh enabled so I can remotely log into it.
Step 1. Open up a command line
To access the command line you can do the following:
- Perform an ssh login to access your Raspberry Pi
- On a Raspberry Pi desktop version, open up a terminal window
For this article I ssh'd into my Pi, like this (if doing the same, change mypi to your Pi's name):
ssh pi@mypi.local
Step 2. Plug in the USB drive
For this example I'm using a USB 3.1 drive. So I can plug it into the USB 3.0 ports on the Raspberry Pi 4. They are the USB ports indicated by a light blue interior.
Step 3. Run the lsblk command
To see what storage devices you have on your system you can run the lsblk command.
Without going into too much detail, the command lists "block devices" - in simple terms it usually refers to storage devices, like hard drives and SSD drives.
To verify that the Raspberry Pi can see the new device, run this command:
lsblk -o UUID,NAME,FSTYPE,SIZE,MOUNTPOINT,LABEL,MODEL
If for some reason this fails, try putting sudo in front of the command (sudo lsblk...).
You should see the new drive listed in the results:
UUID                                 NAME        FSTYPE  SIZE MOUNTPOINT LABEL      MODEL
                                     sda                 1.8T                       Samsung_Portable_SSD_T5
E###-####                            └─sda1      exfat   1.8T            Samsung_T5
                                     mmcblk0             7.4G
4###-####                            ├─mmcblk0p1 vfat    256M /boot      boot
4#######-####-####-####-0########### └─mmcblk0p2 ext4    7.2G /          rootfs
Step 4. Install the exfat driver
In the previous step, note that the FSTYPE value listed for the new drive is exfat.
That means that you should install the exfat driver, using this command:
sudo apt install exfat-fuse
- When prompted about the need for additional diskspace, select Yes (Y)
{% include google-article.html %}
Step 5. Run blkid
Another "block device" command is blkid. It will list a bunch of information for each block device.
Run the following:
blkid
Again, if the command fails, try putting sudo in front of it.
You should see a response similar to this:
/dev/mmcblk0p1: LABEL_FATBOOT="boot" LABEL="boot" UUID="4###-###" TYPE="vfat" PARTUUID="7#######-01"
/dev/mmcblk0p2: LABEL="rootfs" UUID="4#######-####-####-####-07##########" TYPE="ext4" PARTUUID="7#######-02"
/dev/mmcblk0: PTUUID="7#######" PTTYPE="dos"
/dev/sda1: LABEL="Samsung_T5" UUID="E###-####" TYPE="exfat" PARTUUID="4#######-##"
The last line refers to the Samsung device. In fact you could filter out all of the other noise by piping the output through grep:
blkid | grep Samsung
Which would just return:
/dev/sda1: LABEL="Samsung_T5" UUID="E###-####" TYPE="exfat" PARTUUID="4#######-##"
Step 6. Create a mount point
A mount point is a way to map (or mount) a device to a folder. If you are familiar with Windows, the way to do it is to map a new device to a drive letter (D:\, etc.).
Linux and Raspbian don't use drive letters. Instead they use folders mapped under a /mnt parent folder.
To create a new mount point under the /mnt folder you must make a new subfolder like this:
sudo mkdir /mnt/xdisk
For this example I called the new subfolder xdisk - you can call it whatever you want. Though keep it simple and avoid spaces, caps or special character.
Step 7. Mount the drive to the folder
Now that you have a new mount point setup, you can map the external SSD to it.
Since the lsblk command showed that the device is seen as /dev/sda1, the command should be:
sudo mount /dev/sda1 /mnt/xdisk
You should see a response like this:
FUSE exfat 1.3.0
If not, make sure that you are using the same mount point as me, or change the mount point to whatever you are using.
Step 8. Verify the drive is mounted
- List the contents of the external SSD by referencing the mount point:
ls -ls /mnt/xdisk
Samsung preloaded some files on the drive. So you may see a response like this:
9856 -rwxrwxrwx 1 root root 10066964 Nov 20  2018  SamsungPortableSSD_Setup_Mac.pkg
6784 -rwxrwxrwx 1 root root  6915240 Nov 20  2018  SamsungPortableSSD_Setup_Win.exe
 128 -rwxrwxrwx 1 root root      118 Jan 20  2016 'Samsung portable SSD SW for Android.txt'
Step 9. Verify that you can write to the drive
To verify that you can write to the external SSD do the following:
- Create an empty file on the SSD:
touch /mnt/xdisk/test.txt
- Verify that the new file was created on the external SSD:
ls -ls /mnt/xdisk
- Append some text to the new file:
echo 'This is a test.' >> /mnt/xdisk/test.txt
Dump the file to the command line:
cat /mnt/xdisk/test.txt
Step 10. Run the disk filesystem utility
Whenever you want to see how much space you have on your drives, run the df (disk filesystem) utility:
df -h
You should see a response like this (notice the new drive at the bottom):
Filesystem      Size  Used Avail Use% Mounted on
/dev/root       7.1G  1.3G  5.5G  19% /
devtmpfs        841M     0  841M   0% /dev
tmpfs           970M     0  970M   0% /dev/shm
tmpfs           970M  8.4M  962M   1% /run
tmpfs           5.0M  4.0K  5.0M   1% /run/lock
tmpfs           970M     0  970M   0% /sys/fs/cgroup
/dev/mmcblk0p1  253M   54M  199M  22% /boot
tmpfs           194M     0  194M   0% /run/user/1000
/dev/sda1       1.9T   79M  1.9T   1% /mnt/xdisk
Step 11. Automatic mounting on reboot
If you reboot or shutdown the Pi, the external SSD won't be remounted when you restart it.
To automatically mount the external SSD on startup, do the following:
- Get the PARTUUID of the external drive
blkid | grep sda1
You should get a response like this:
/dev/sda1: LABEL="Samsung_T5" UUID="E123-1234" TYPE="exfat" PARTUUID="41234567-01"
- Save the PARTUUID label somewhere. Yours will be different from the example above.
Step 12. Edit /etc/fstab
Using the nano editor, update /etc/fstab:
sudo nano /etc/fstab
Paste in this line, replacing the PARTUUID with your external drives value returned by the blkid command:
PARTUUID=4#######-01 /mnt/xdisk exfat defaults,auto,users,rw,nofail,x-systemd.device-timeout=30,umask=000 0 0
Now we want to test that when the Pi reboots that line will be valid.
The way to test that is to do the following:
- Unmount the external drive:
sudo umount /dev/sda1
- Now mount any drives from /etc/fstab that are not already mounted:
sudo mount -a
If there was something wrong with the line in /etc/fstab you would see an error.
Instead, hopefully you saw something like this:
FUSE exfat 1.3.0
If you run the command again nothing will happen. That's because all drives listed in /etc/fstab have now been mounted.
Step 13. Verify the drive is mounted
To verify that the drive has been mounted again:
- Verify the device can be seen by the df utility:
df -h | grep sda1
- Verify that the files on ther external SDD can be listed:
ls -ls /mnt/xdisk
Step 14. Verify the drive is automatically mounted after a reboot
To verify that the external SSD is automatically mounted when the Pi restarts, do the following:
- Reboot the pi:
sudo reboot
- ssh back into it (replace mypi with your Pi host name):
ssh pi@mypi.local
- Verify the drive is mounted:
df -h
- Verify that you can list the contents of the external SSD:
ls -ls /mnt/xdisk
Congratulations! You've successfully mounted an external hard drive to a Raspberry Pi 4!
Troubleshooting
Here are some commands to look at if you have trouble mounting the drive:
Check the drive
sudo fsck.exfat /dev/sda1
exfatfsck 1.3.0
Checking file system on /dev/sda1.
File system version           1.0
Sector size                 512 bytes
Cluster size                128 KB
Volume size                1863 GB
Used space                   79 MB
Available space            1863 GB
Totally 0 directories and 4 files.
File system checking finished. No errors found.
List the drive types
df -T
You should see something like this:
Filesystem     Type      1K-blocks    Used  Available Use% Mounted on
/dev/root      ext4        7345912 1286872    5728748  19% /
devtmpfs       devtmpfs     860900       0     860900   0% /dev
tmpfs          tmpfs        992996       0     992996   0% /dev/shm
tmpfs          tmpfs        992996    8600     984396   1% /run
tmpfs          tmpfs          5120       4       5116   1% /run/lock
tmpfs          tmpfs        992996       0     992996   0% /sys/fs/cgroup
/dev/mmcblk0p1 vfat         258095   54399     203696  22% /boot
tmpfs          tmpfs        198596       0     198596   0% /run/user/1000
/dev/sda1      fuseblk  1953511936   80512 1953431424   1% /mnt/xdisk
Notice that the new external drive is of type fuseblk.
List only for a specific drive type
df -t fuseblk
You should see a response like this:
Filesystem      1K-blocks  Used  Available Use% Mounted on
/dev/sda1      1953511936 80512 1953431424   1% /mnt/xdisk
Conclusion
In this article you learned how to:
- Mount an external drive
- Map an external drive to a folder
- Edit /etc/fstab
- Automatically mount an external drive when your Pi is rebooted
- Unmount an external drive
- Troubleshoot drive mounting issues
Related Articles
Here is a list of my related articles that you may find interesting:
- Headless Raspberry Pi 4 SSH WiFi Setup (Mac + Windows)
- Raspberry Pi Resource Guide - checkout my resource guide for links to useful hardware