
Headless Raspberry Pi 4 MQTT Setup
This article covers setting up an MQTT broker on a headless Raspberry Pi 4.
Because of the way it is spelled, some people refer to MQTT as "Mosquitto."
If you'd like to know how I setup the headless image for testing, I've provided some links at the end of this article. The image I've setup has ssh enabled so I can remotely log into it.
Step 1. Remote login to the Raspberry Pi
- Open up a terminal / command line window on your computer
- Perform an ssh login to access your Raspberry Pi
- For example (substitute mypi with your Pi's hostname):
ssh pi@mypi.local
Step 2. Run the latest updates
- Make sure your Pi has the latest updates:
sudo apt-get update -y
sudo apt-get upgrade -y
Step 3. Install MQTT
- Run these commands to install MQTT:
sudo apt-get install mosquitto -y
sudo apt-get install mosquitto-clients
Step 4. Configure MQTT
- Edit the MQTT configuration file:
sudo nano /etc/mosquitto/mosquitto.conf
- Append these lines to the bottom of the file and save it:
allow_anonymous false

password_file /etc/mosquitto/pwfile

listener 1883
Step 5. Set an MQTT username and password
- Run this command to create an MQTT username and password (substitute YOUR-NEW-MQTT-USERNAME):
sudo mosquitto_passwd -c /etc/mosquitto/pwfile YOUR-NEW-MQTT-USERNAME
Step 6. Test the broker
- Substitute YOUR-MQTT-USERNAME and YOUR-MQTT-PASSWORD with what you defined in the previous step.
mosquitto_sub -d -u YOUR-MQTT-USERNAME -P YOUR-MQTT-PASSWORD -t dev/test
- You should get back a response similar to this:
Client mosqsub|730-hostname sending CONNECT
Client mosqsub|730-hostname received CONNACK (0)
Client mosqsub|730-hostname sending SUBSCRIBE (Mid: 1, Topic: dev/test, QoS: 0)
Client mosqsub|730-hostname received SUBACK
- Press Ctrl-C to break out of it.
Step 7. Verify the MQTT broker works after reboot
- Reboot the Pi:
sudo reboot
- Remote login again
ssh pi@mypi.local
- Test that you can connect to the broker again (substituting YOUR_USERNAME and YOUR_PASSWORD):
mosquitto_sub -d -u YOUR-MQTT-USERNAME -P YOUR-MQTT-PASSWORD -t dev/test
Step 8. Verify that the MQTT broker is available to other machines
To test I used MQTT Explorer which is available for Mac, Windows, Ubuntu and Linux.
On a Mac you can download it from the Mac App Store (currently for free).
For other operating systems I've included a link to the explorer at the end of this article.
Publish a message
Here is how to test on a Mac:
- On the Pi, run the following and leave the terminal window open (substituting values):
mosquitto_sub -d -u YOUR_USERNAME -P YOUR_PASSWORD -t dev/test
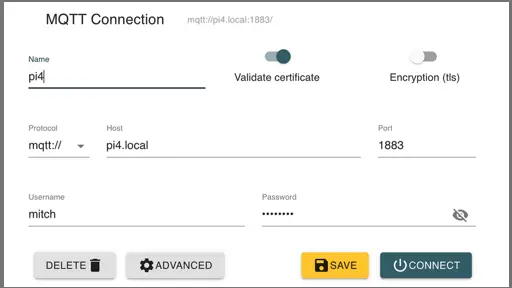
- On your Mac create a connection to the broker using MQTT Explorer
- For a host name enter YOUR-PI-HOSTNAME.local (substiting YOUR-PI-HOSTNAME)
- This will bring you to a new screen
- Click on the Publish panel (look in the right sidebar)
- For Topic enter:
dev/test - Click the raw radio button
- In the text field type:
hello world! - Click PUBLISH
- This should be echoed to the Pi like this:
Client mosqsub|597-pi4 received PUBLISH (d0, q0, r0, m0, 'dev/test', ... (12 bytes))
hello world!
Troubleshooting
If you are having trouble connecting, make sure that your computer and the Pi are on the same network.
Conclusion
In this article you learned how to:
- Install an MQTT broker on a headless Raspberry Pi
- Verify the broker is running
- Verify the broker is still running after reboot
- Verify the broker can be connected to from another machine
Related Articles
Here is a list of my related articles that you may find interesting:
- Headless Raspberry Pi 4 SSH WiFi Setup (Mac + Windows)
- Raspberry Pi Resource Guide - checkout my resource guide for links to useful hardware
