
How to Control a Servo Array with NodeJS

Recently I wrote an article titled How to Control an Arduino Uno with NodeJS. In it I discussed how to control an LED over HTTP using an Arduino hooked up to a host using NodeJS and the johnny-five library. In this article I'm going to expand on that to show how to use a similar technique to control a couple of micro servos.
Disclaimer
If you damage any of your equipment the author takes no responsibility.
What You Will Need
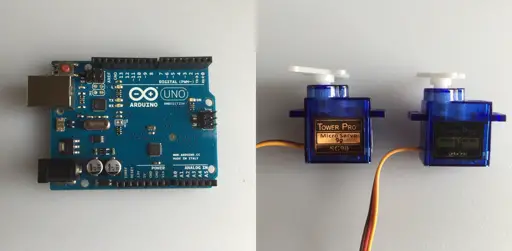
- An Arduino Uno board with USB cable
- The Arduino IDE installed on the host computer (download it here)
- NodeJS and npm installed on the host (it may already be installed)
- Tower Pro SG90 Micro Servos (x2)
- I got mine from Amazon: Authentic Tower Pro SG90 -- 2 Pack (affiliate link)
If you are testing with one servo
If you are testing with just one servo the above list will cover everything you need.
If you are testing with two servos
If you are testing with two servos you will also need the following:
- Breadboard
- Male-to-Male jumper wire in multiple colors
- On Amazon I picked up a pack that has M-to-F, F-to-F, M-to-M, Elegoo 120pcs Multicolored Dupont Wire 40pin Male to Female, 40pin Male to Male, 40pin Female to Female Breadboard Jumper Wires Ribbon Cables Kit for arduino (affilate link)
- External Power Supply
- Option 1: Battery back producing 4.8 to 5v
- Option 2: DC adapter that produces 4.8 to 5v (check with a multimeter!)
- Option 3: Variable power supply that can produce between 4.8 to 5v
- I got mine from Amazon: Dr.Meter PS-305DM 30V/5A Single-Output DC Power Supply 110V/220V Switchable, Alligator clip included, US 3-prong Cable (affiliate link)
Wiring the Servo
You will need to double check the specs or your particular servo. Here are the specs for the one that I am using:
- Orange: PWM (Pulse Width Modulation)
- Red: Vcc (+)
- Brown: Ground
To be less confusing I plug in the following colored jumper wires:
- Orange: PWM -> Yellow jumper
- Red: Vcc (+) -> Red jumper
- Brown: Ground -> Black jumper

For multiple servos you could use a range of different colored jumpers in place of the yellow jumper. I would try to keep the power jumpers red and black on all servos.
Wiring for a Single Servo
For a single servo you could risk plugging a micro servo directly into the Arduino as in this diagram. Or could play it safe and use a breadboard with an external power supply (see next diagram).

Wiring for a Servo Array
For multiple servos you should use an external power supply. It's represented by the battery pack in this diagram.
IMPORTANT NOTE: The Arduino does NOT get its power from the same place as the servos. Only the GROUND is connected to the external power. The Arduino will get its power from the USB cable.

The above files were created using the free tool from http://fritzing.org.
Create the NodeJS Program
- Open up a Terminal window
- Create a folder:
mkdir arduino-servo - Change to it:
cd arduino-servo - Type:
npm init - Just hit enter at all the prompts to accept the defaults
- Type (note two dashes before each save):
npm install johnny-five --save
npm install express --save
- Create a file called index.js using your favorite text editor
Add this code and save the file:
Code Description
The code above does the following:
- References required modules and sets variables
- Defines a function using the johnny-five modules board object for processing a ready event from the Arduino board
- Defines a function using the express module to process HTTP GET requests in the form of /servos/mode/value
- mode can be: { sweep, stop, min, max, or to }
- value is optional and only required by the to command (i.e.: /servos/to/45)
- Modes are mapped via a switch statement to functions on the servos object
- Uses the express module to listen for HTTP requests on the port (in this case 8000)
Run the Program on the Arduino Uno.
Note that these instructions were written for a Mac.
Hook the Arduino Uno up to your Mac via the USB cable
- Launch the Arduino IDE
- Set the serial port in the IDE: Tools / Port / *(Arduino)
- Select: File / Examples / Firmata / Standard Firmata
- Select: Sketch / Upload (there's also a button on the UI to do it)
- At the command line type:
node index.js
Leave that terminal window open and open up another one. In the new terminal window try the following commands:
curl -X GET "http://localhost:8000/servos/sweep"
curl -X GET "http://localhost:8000/servos/stop"
curl -X GET "http://localhost:8000/servos/min"
curl -X GET "http://localhost:8000/servos/max"
curl -X GET "http://localhost:8000/servos/to/45"
The stop command is good for stopping things after the sweep command.
If curl doesn't work on your system try substituting wget.
If you still can't get it to work, try typing the URL's into a browser (works best with Chrome).
When you type a command the servos should respond.
To stop the node server: in the original terminal window press Ctrl-C twice.
Console Output
On startup, look for a board ready message in the console. Check your USB connection if you don't see it.
Valid requests should log an "OK" message to the console. Invalid requests (such as /servo/foo) should log an error.
Remote Control
As mentioned in the original article: What we've done here is define a Web service to control an Arduino board through a host running a NodeJS server. You could call the Web services through the browser or wrap them in HTML. You could even build mobile phone apps to call the Web services behind the scenes.
Alternatives
You don't have to wire an Arduino to a host to drive it via HTTP. There are ethernet and wireless shields (add-on boards) that you can use. It all depends on what type of device you plan to build.
Servo Shields
This setup is good for driving a couple of light servos. But if you want to step it up a bit look at the various shields that are available. Here is one example:
- Adafruit 16-Channel 12-bit PWM/Servo Shield (affiliate link)
Related Articles
- How to Build an Arduino Uno Robot (Free Course)
- PCA9685 Servo Driver with Seeeduino Nano (Arduino Compatible)
- How to Control an Arduino Uno with NodeJS -- the original article that shows how to control the onboard LED
- Arduino Uno Resource Guide
References
- Johnny-Five -- "The JavaScript Robotics & IoT Platform" (source)
- Servos -- API (source)
- Servos -- An Array of Servos (requires an additional power supply) (source)
If you are interested in using a Raspberry Pi with johnny-five checkout these links:
