
Arduino UNO Robot Class Library Setup (8 Steps)
This article covers how to setup a class library for an Arduino UNO robot.
In my previous articles I showed you how to assemble an Arduino Robot and how to program it with a simple motion loop.
In this article I'll walk you through how to repackage that code into a class library that can be expanded upon later.
This is part of my free mini-course: How to Build an Arduino UNO Robot. Which I'm making available as a series of blog posts.
Step 1. Prepare the robot for new code
In my previous article I defined the steps for how to prep the robot for programming while attached to your computer.
Those steps are:
- Mount the robot on a box for testing (make sure the wheels can spin freely!)
- Remove the VIN (power) jumper from the motor shield
- Plug in the battery pack
- Plug the cable into the Arduino
If you need more details on the above, please refer back to the previous article.
Step 2. Launch the Web editor
For working with the Arduino Uno WiFi Rev2 I've found it easer to use the Web editor.
Open up the editor at:
Create a new sketch.
If you want to follow along with my exact steps, rename the sketch to:
desertbot_RobotA01_test
That's a zero and not a letter in A01
I'm using the code A01 to mean, Arduino robot version 01.
Step 3. Add a header file
Behind the scenes standard Arduino files follow the C++ syntax.
C++ uses header files that can be included in programs to specify what a class looks like.
In other words, what properties and methods on the class are available for use.
Next to the sketch title in the Web editor you will see a drop down:
- Click the dropdown
- Click Add Tab
- A tab in the editor is like adding a new file
- Click on the tab for the new file
- Click the dropdown again
- Click the Rename option
- Rename the file (tab) desertbot_RobotA01.h
Paste in this code:
/*
* Author: Mitch Allen
* Web Site: https://desertbot.io
*
* Reference:
https://learn.adafruit.com/adafruit-motor-shield-v2-for-arduino/using-dc-motors
*/
#ifndef desertbot_RobotA01_h
#define desertbot_RobotA01_h
#include <Wire.h>
#include <Adafruit_MotorShield.h>
#include "utility/Adafruit_MS_PWMServoDriver.h"
// Do NOT set any values, even constants or fails to compile
// Like it's ignoring the ifndef
class desertbot_RobotA01
{
private:
Adafruit_MotorShield AFMS;
Adafruit_DCMotor *motor1;
Adafruit_DCMotor *motor2;
public:
int delayMs;
// Valid values: 0 - 255
// Robot may not move below 50
int speed;
desertbot_RobotA01();
void init();
void pause();
void forward();
void backward();
void spinLeft();
void spinRight();
void motionLoop();
};
#endif
Code Description
ifndef wrapper
First you will notice that the class definition is wrapped like this:
#ifndef desertbot_RobotA01_h
#define desertbot_RobotA01_h

class desertbot_RobotA01 { ... }

#endif
In theory that's supposed to keep the header from being loaded twice, if it's included in a second file. That normally works in C++. But here, if you so much as define a default value (like int speed = 0) or even a constant above the class definition, that switches how the compiler interprets the header. So it pulls it in twice, and throws an error.
So don't define any default values or constants in the header to avoid errors.
Include motor driver headers
The headers from the motion loop example in the previous article are included here. The idea being that later when you include this header file, it will include the supporting headers. It's also needed to use the special definitions for the motor driver properties, etc.
Class definition
- A class called desertbot_RobotA01 is defined
- What were global variables in the orginal motion loop code are now private and public properties within the robot class
- private properties and methods can only be seen internally by other methods - in other words they have no global "scope"
- public properties and methods can be accessed externally - as you will see soon
Properties
In the original motion loop code the properties below were defined and initialized as global values.
Here they are just defined in the header and will be initialized later.
The private properties to interact with the motor driver are:
Adafruit_MotorShield AFMS;Adafruit_DCMotor *motor1;Adafruit_DCMotor *motor2;
The public properties for controlling the robot delay and speed are:
int delayMs;- a delay setting to be used within the class- defined in milliseconds (3000ms = 3 seconds)
int speed;- the speed to be passed to the motor driver- valid values: 0 - 255
- the robot may not move below 50
- above 75, make sure the battery pack is strapped down or it may fly out of the robot!
Methods
In object oriented programming, methods are what you call functions that are part of a class.
Here, the methods from the original example are incorporated into the class along with a "constructor".
desertbot_RobotA01();- the constructor- in C++ the constructor has the same name as the class
- when a program "instantiates" (creates) an instance of a class, the constructor is called to setup values, call setup methods, etc.
void init();- the constructor is fine for setting up default values (delayMs, speed, etc), but you need to wait on calling setup methods for the motor driver - those will happen here- the downside is that you need to remember to call the init method first or the other methods won't work properly
void pause();- code to stop the robot- I was going to call the method stop, but the Arduino Editor flags it as a reserved word
void forward();- move the robot forwardvoid backward();- move the robot backwardsvoid spinLeft();- spin the robot leftvoid spinRight();- spin the robot rightvoid motionLoop();- take the code from the original examples loop, and put it in its own method
Step 4. Add a class file
Now that the properties and methods have been defined in the header, it's time to implement them.
- Click the dropdown
- Click Add Tab
- Click on the tab for the new file
- Click the dropdown again
- Click the Rename option
- Rename the file (tab) desertbot_RobotA01.cpp
Paste in this code:
/*
 * Author: Mitch Allen
 * Web Site: https://desertbot.io
 *
 * Reference:
    https://learn.adafruit.com/adafruit-motor-shield-v2-for-arduino/using-dc-motors
 */

#include "desertbot_RobotA01.h"

desertbot_RobotA01::desertbot_RobotA01()
{
  // constructor
  delayMs = 3000; // 3000ms = 3 seconds
  // Valid speed values: 0 - 255
  // Robot may not move below 50
  // WARNING: at higher speeds, secure the battery pack
  speed = 50;
}

void desertbot_RobotA01::init() {
  AFMS = Adafruit_MotorShield();
  motor1 = AFMS.getMotor(1);
  motor2 = AFMS.getMotor(2);
  AFMS.begin();
  motor1->setSpeed(speed);
  motor2->setSpeed(speed);
}

void desertbot_RobotA01::pause()
{
  motor1->run(RELEASE);
  motor2->run(RELEASE);
}

void desertbot_RobotA01::forward()
{
  motor1->run(FORWARD);
  motor2->run(FORWARD);
}

void desertbot_RobotA01::backward()
{
  motor1->run(BACKWARD);
  motor2->run(BACKWARD);
}

void desertbot_RobotA01::spinLeft()
{
  motor1->run(BACKWARD);
  motor2->run(FORWARD);
}

void desertbot_RobotA01::spinRight()
{
  motor1->run(FORWARD);
  motor2->run(BACKWARD);
}

void desertbot_RobotA01::motionLoop()
{
  // Forward
  delay(delayMs);
  pause();
  delay(delayMs);
  forward();

  // Backward
  delay(delayMs);
  pause();
  delay(delayMs);
  backward();

  // Right
  delay(delayMs);
  pause();
  delay(delayMs);
  spinRight();

  // Left
  delay(delayMs);
  pause();
  delay(delayMs);
  spinLeft();
}
Code Description
desertbot_RobotA01()
In the constructor you can set the default values for delayMs and speed.
You can change the default values to any reasonable limit (50-255 for speed).
Why are there no arguments to the constructor? Why can't you change the default values when creating a new object? Because I'm not a fan of passing arguments to constructors. I prefer to set property values and call an intialization function afterwards. I find this makes the code more readable and less confusing.
init()
The constructor is fine for setting up default values (delayMs, speed, etc). But if you call the functions to initialize and setup the motor driver in the constructor they may not work. Especially if you setup your robot using a global variable.
You need to wait and make the function calls later from a method. The method should be called in your main Arduino files setup function.
As mentioned above, it also gives a chance to redefine the delayMs and speed values before the initialization methods are called. You will see an example later when I show how to use the class in a program.
The downside is that you need to remember to call the init method first or the other methods won't work properly. I could add a lot of code to guard and warn about this, but that would make the code a lot more complicated than it needs to be.
pause()
To pause or stop the robot, this method passes the RELEASE value to both motors:
motor1->run(RELEASE);
motor2->run(RELEASE);
forward()
To drive the robot forward, this method passes the FORWARD value to both motors:
motor1->run(FORWARD);
motor2->run(FORWARD)
backward()
To drive the robot backward (in reverse), this method passes the BACKWARD value to both motors:
motor1->run(BACKWARD);
motor2->run(BACKWARD);
spinLeft()
To spin the robot to the left, this method passes the BACKWARD value to the first motor and the FORWARD value to both second:
motor1->run(BACKWARD);
motor2->run(FORWARD);
spinRight()
To spin the robot to the right, this method passes the FORWARD value to the first motor and the BACKWARD value to both second:
motor1->run(FORWARD);
motor2->run(BACKWARD);
motionLoop()
The motion loop code is based on the code that was in the main loop function of the original example.
It will run the motors in the following sequence, pausing between each step:
- Forward
- Backward
- Spin Right
- Spin Left
The delayMs property defines how long the code waits for each pause and how long each movement happens. So if delayMs is set to 3000, it will start with:
- Pause for 3 seconds
- Forward for 3 seconds
- Pause for 3 seconds
- Backward for 3 seconds
- etc.
You can change the behavior of the motion loop or add alternative motion loop methods.
It's a handy method to call when you just want to make sure that the robot is working properly.
Remember that the method only calls the sequence once. To get it to loop, you need to call it within the loop method of your main Arduino program, which I will demo below.
Step 5. Add the test / example code
Now that the robot class has been defined, add some code to the main file to test it.
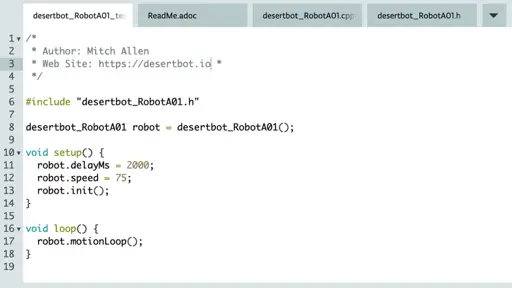
In the editor, click on the first file in the sketch (desertbot_RobotA01_test) and paste in this code:
/*
 * Author: Mitch Allen
 * Web Site: https://desertbot.io
 */

#include "desertbot_RobotA01.h"

desertbot_RobotA01 robot = desertbot_RobotA01();

void setup() {
  robot.delayMs = 2000;
  robot.speed = 75;
  robot.init();
}

void loop() {
  robot.motionLoop();
}
Code Description
The code above does the following:
- includes the header file for the robot class
- instantiates (creates) an instance of the class and assigns the instance to the robot variable
- the setup function does the following
- overrides the default value for delayMs
- overrides the default value for speed
- remember: over 75 and make sure the batteries are strapped down!
- calls the init method to intializes the robot with the motor driver board
- the loop function calls the robot motionLoop method repeatedly to run the robot through its motion loop sequence
Note that if you didn't set (override) the delayMs or speed values in the setup method, the init method would have just used the default values defined in the constructor.
Step 6. Upload the code to the board
- Above the edit window, search for Arduino Uno WiFi Rev2
- Click the Upload and Save (arrow) button
- You may see some errors fly by at the bottom of the screen
- If the uploading ends with a green Success message the upload was successful
Step 7. Test the code while tethered
- Double check and make sure that the robot wheels are not touching anything
- Flick the power button on
- The robot should pause for few seconds, then go through the motion loop
- You should see the wheels spin forward, backward, rotate as if turning left, then right
Step 8. Test on battery power
- Turn off the power switch on the robot
- Disconnect the cable between the Arduino board and your laptop
- Put the VIN (power) jumper back on the motor shield
- Tuck the battery pack inside the robot
- Make sure the weight is over the universal wheel
- Put the robot in the middle of a room
- Flick on the power switch
- After a brief pause the robot should go through the motion loop
- Repeatedly going forward, backward, turning left and turning right
Once you get it working, be sure to leave a comment and add a photo to one of the pins on the desertbot.io Arduino board on Pinterest.
Going further
Here are some suggestion for more experimenting:
- comment out the delayMs and speed settings in the setup method to see what happens
- it should use the default settings in the constructor
- try changing the delayMs and speed values in the setup method to see what happens
- strap in those batteries first!
- add a method to the class to define your own motion loop
- define it in the header
- provide the code in the cpp file
- call it in the test loop
Troubleshooting
The robot lights up but doesn't move
- If the robot is no longer tethered, did you put the power jumper back on?
The robot whines and doesn't move
- It's possible that the batteries are low or the speed is too low
- Charge the batteries and / or increase the speed value in the code
Refer to the Troubleshooting section of my previous article for more tips.
Conclusion
In this article you learned how to:
* Create an Arduino class library
* Define a robot class library
* Convert methods from an example file into a class
* Test the class within a test / example file
* Run the test on a robot
Related Articles
- How to Build an Arduino UNO Robot (Free Course)
- Arduino UNO Robot Motion Loop
- Arduino UNO Robot Hardware Selection
- Arduino UNO Robot Hardware Assemble
- Motor Driver Tutorial (L298N)
- How to Read an Arduino Nano 33 IOT IMU
References
- Adafruit Motor Shield V2 - Using DC Motors - [1]