
Headless Raspberry Pi 4 Lite Remote Desktop Upgrade
This article covers upgrading a headless Raspberry Pi 4 lite image with a desktop. You won't need a mouse, monitor or keyboard. I'll also show you how to connect over VNC.
Step 1. Prepare the lite image for an upgrade
If you don't have a lite image, see my previous article:
Once you have a Pi with a lite image:
- Make sure that your computer and the Raspberry Pi are on the same network
- Open up a terminal or command window on your computer
- Login into your Raspberry Pi using ssh (replace mypi with your host name):
ssh pi@mypi.local
Run the commands below to make sure that your Pi has the latest upgrades:
sudo apt update -y
sudo apt upgrade -y
sudo apt dist-upgrade -y
Reboot:
sudo reboot
When the Pi reboots, you'll lose your connection.
- Give your Raspberry Pi a minute or two to reboot
- Login using ssh into it again
For example:
ssh pi@YOUR-PI-HOSTNAME.local
Step 2. Install the X server
Install an X server:
sudo apt install xserver-xorg xinit -y
Step 3. Install the PIXEL desktop
There are several types of desktops that you can install on a Raspberry Pi. To keep things simple I am going to show you how to install PIXEL.
PIXEL stands for Pi Improved Xwindows Environment, Lightweight.
To install the PIXEL desktop, do the following:
sudo apt-get install raspberrypi-ui-mods -y
This step may take a while.
Step 4. Enable VNC
By default a Raspberry Pi does not allow a remote VNC connection. You have to enable it through raspi-config. It will also install the required VNC server.
sudo raspi-config
- Select Interfacing Options
- Select VNC
- For the prompt to enable VNC, select Yes (Y)
- For the confirmation, select Ok
This may take a while too.
{% include google-article.html %}
Step 5. Important! Change the default screen resolution
There is a weird quirk where you must change the screen resolution or VNC will report "Cannot currently show the desktop."
Still from within raspi-config:
- Select Display
- on older versions this was under Advanced Options
- Select Resolution
- Select anything but the default (example: 1024x768)
- Select Ok
Once you've established that it works, you can go back and try other screen resolutions.
Step 6. Enable the desktop on boot
Still from within raspi-config:
- Select Boot Options
- Select Desktop / CLI
- Select Desktop
For the last step you could also select the less secure option: Desktop Autologin
- Select Finish
- When prompted to reboot, select Yes
Step 7. Install the RealVNC viewer on your computer, smartphone or tablet
Download the RealVNC viewer for your operating system.
Browse to:
For some operating systems the downloaded file may be an installer that needs to run. If that's the case, run the installer.
Step 8. Connect over VNC
Launch the VNC viewer on your computer and type the name of the Raspberry Pi server into the Connect address bar.
For example: mypi.local
If prompted, enter your Raspberry Pi username and password to connect.
Step 9. Install a package manager and a browser
- Exit the remote desktop
- Login over ssh if you haven't already
sudo apt install synaptic chromium-browser
- When prompted for additional disk space select Yes (Y)
- It may take a while to install Chromium
{% include google-article.html %}
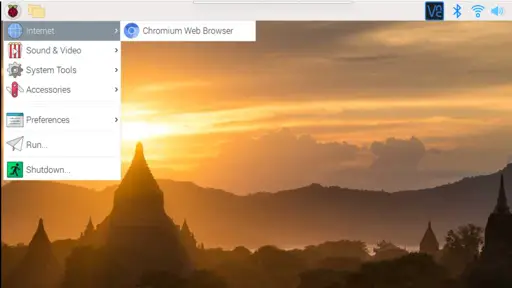
Step 10. Run the browser
- Remote login to your Raspberry Pi again over VNC
- Click on the Raspberry icon in the upper left toolbar of your Raspberry Pi desktop
- Select Internet / Chromium Web Browser
Step 11. Run the package manager
From within the remote desktop for your Pi:
- Click on the Raspberry icon in the upper left toolbar
- Select Preferences / Synaptic Package Manager
- Enter your password when prompted
- Click the Search button in the upper right toolbar to find packages to install
Troubleshooting
Remote desktop grabs the mouse
- Wave your mouse over the top middle of the screen
- A special VNC only menu should appear
- Wave your mouse over the first menu option
- Select Exit full screen if that is the current option
- Put your mouse over the lower right corner
- Drag the corner to make the remote screen smaller
- The remote desktop may still have focus
- Click your mouse somewhere on your host desktop to regain control
Smartphone clicks not working
When using the VNC viewer on a smartphone you have to position the mouse cursor. Then tap to click.
Conclusion
In this article you learned how to do the following:
- upgrade a headless lite version of Raspbian to a desktop version
- enable and install a VNC server on a Raspberry Pi
- install a VNC viewer on your computer, smartphone or tablet
- connect to a remote desktop over VNC
- install a browser and package manager for your desktop
Related Articles
Here is a list of my related articles that you may find interesting:
- Headless Raspberry Pi 4 External SSD Setup (Samsung T5) - my article on how to mount an external SSD using headless operations
- Headless Raspberry Pi 4 Remote Desktop VNC Setup (Mac + Windows) - in this article I show how to setup a Raspberry Pi remote desktop from scatch
- Raspberry Pi Touchscreen Kiosk Setup - in this article I show how to run a Raspberry Pi in kiosk mode, where the only thing a user sees is your Web app
- Headless Pi Zero W Wifi Setup (Windows) - if you would like to setup a Raspberry Pi Zero W for headless operation, I have you covered on that too in this guide for Windows users
- Setup Pi Zero W Headless Wifi (Mac) - if you are Mac user with a Raspberry Pi Zero W, I have instructions for you too
- Raspberry Pi Resource Guide - checkout my resource guide for links to my most popular Raspberry Pi articles, as well as useful hardware
References
- Introducing PIXEL (raspberrypi.org) [1]